Self-Saucing Chocolate Puddings with Earl Grey Ice Cream and Almond Tuile

Self-Saucing Chocolate Pudding with Earl Grey Ice Cream and Almond Tuile

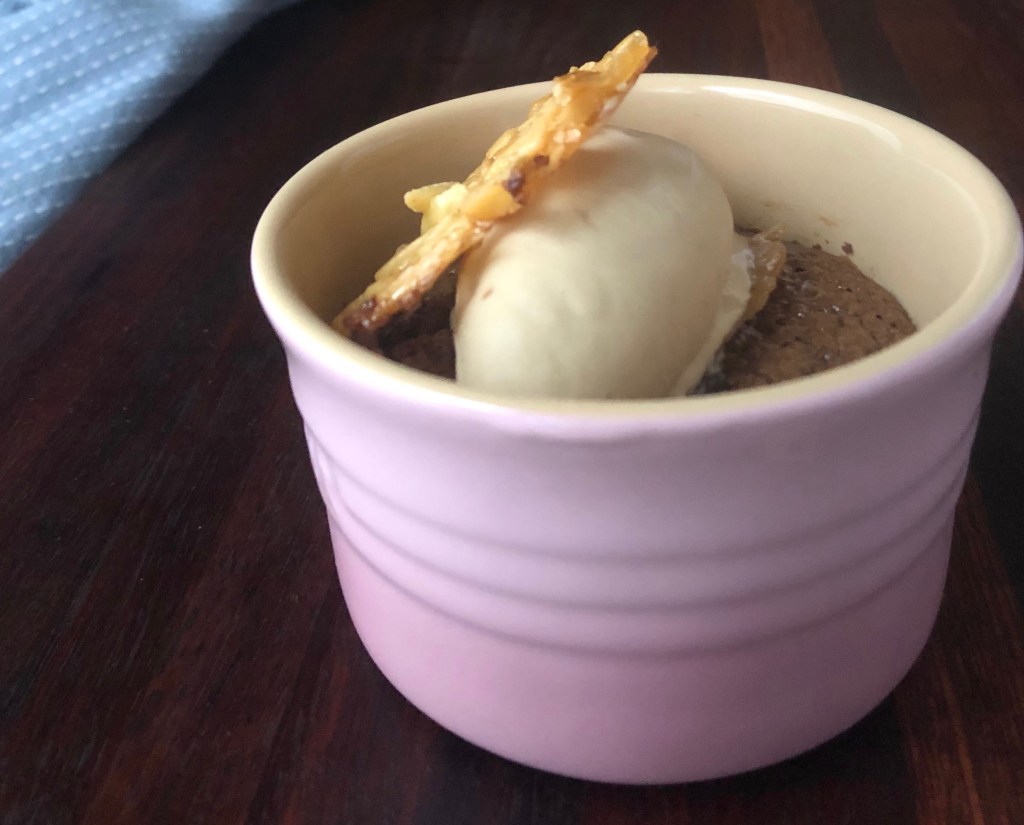
A while ago we made a batch of Earl Grey Ice Cream, which was so delicious and had the smoothest, creamiest consistency. It just seemed like it needed a few more elements to make it a special dessert worth serving at a dinner party. It’s winter here in Sydney so there’s nothing better than a nice warm little ramekin filled with a gooey chocolate pudding. Topped with the ice cream and then a crunchy little shard of almond tuile, this dish was the perfect end to our recent dinner party.

Best of all, everything can be made in advance, leaving you more time to chat with your guests and enjoy a glass of wine! We made the ice cream a few days ahead and stored it in the freezer. The puddings were prepared in the morning and stored in their ramekins in the fridge until ready to bake. The tuiles can be made a few hours ahead, left to cool and then stored in an airtight container until ready to serve. You’ve got to love a delicious dessert as easy to assemble as this!

Of course, if you’re looking for a comforting pudding without all the bother, you can just make the pudding by itself and add a scoop of store-bought ice cream. Or try toasting a few slivered or flaked almonds to scatter over the pudding.

This recipe serves 6 people, although you will have a lot of leftover ice cream and about twice the amount of tuiles as needed (which can be handy if you need a few tries to get your tuiles perfect like we did!)

Earl Grey Ice Cream

  • 400ml full-cream milk
  • 5 Earl Grey teabags
  • 160g caster sugar
  • 5 egg yolks
  • 450ml thickened cream
  1. Place the milk and teabags in a heavy-based saucepan and bring to a simmer over a medium heat. Reduce the heat to low and leave to infuse for 10-15 minutes, stirring occasionally, until the milk has become a deep brown colour and tastes strongly of tea.
  2. Remove the tea bags and bring the milk back up to a simmer. Add the sugar and stir until dissolved.
  3. Place the egg yolks in a large mixing bowl and lightly whisk. Gradually pour the hot milk mixture into the bowl, whisking continuously so the eggs don’t curdle.
  4. Pour the mixture back into the saucepan and keep stirring over a low heat until thickened enough to coat the back of a spatula.
  5. Set aside to cool for about 10 minutes, then add the cream and stir well. Refrigerate the mixture for at least two hours, or overnight.
  6. Churn the mixture in an ice-cream maker according to the manufacturer’s instructions. You can serve the ice cream immediately from the ice cream maker, although it will have a soft-serve consistency. Or you can place it in an ice cream container and freeze until ready to serve. Just be sure to remove the ice cream from the freezer 10 minutes before you want to serve it.

Chocolate Puddings

  • 100g dark chocolate, chopped
  • 125g butter
  • 2 eggs
  • 2 egg yolks
  • 50g caster sugar
  • 50g ground almonds
  • 1 tsp sea salt flakes
  • butter or vegetable oil for greasing
  1. Grease 6 ramekins or oven proof dishes and set aside. Preheat oven to 170°C.
  2. Place the chocolate and butter in a bowl and set over a saucepan half filled with simmering water, making sure the water doesn’t touch the bowl. Allow the chocolate and butter to melt and stir together.
  3. Whisk the eggs, egg yolks and sugar together for 4 minutes, until pale and thick. Fold in the chocolate mixture, ground almonds and sea salt.
  4. Spoon the mixture into the prepared ramekins and set aside or refrigerate until ready to cook.
  5. When you are ready to serve, bake the puddings for 12-14 minutes, until raised a little but still soft in the middle.

Almond Tuiles

  • 30g water
  • 30g honey
  • 110g butter
  • 115g icing sugar
  • 25g plain flour
  • 60g slivered almonds, toasted
  1. Preheat oven to 160°C.
  2. Heat honey and water in a small pot over a medium heat until the honey has melted.
  3. Sift the icing sugar and flour into the liquid mixture and stir well to incorporate.
  4. Add the slivered almonds and stir well.
  5. Place the tuile mixture in the fridge to cool for about 20 minutes.
  6. Line a baking tray with baking paper.
  7. Using a teaspoon measure, take out one teaspoon of the mixture at a time and roll in your hands to create a small ball.
  8. Place 6 – 8 balls of mixture on the baking tray, leaving room for them to spread as they cook.
  9. Bake in the oven for 10 minutes or until a deep amber colour.
  10. Remove from the oven and allow to cool.
  11. If you’ve managed to create perfect tuile circles, well done! If not, use a cookie cutter to cut out 5cm circles. Or you can snap the tuile into shards instead.
  12. Allow the tuiles to cool completely before serving. If not serving immediately, place in an airtight container until ready to serve.

To Serve:

  • Self-Saucing Chocolate puddings
  • Earl Grey Ice Cream
  • Almond Tuiles
  • 1 lemon
  1. While baking your puddings as described above, use a spoon dipped in warm water to make six quenelles of ice cream, or you could use an ice cream scoop instead.
  2. Once the puddings are ready, use a microplane to grate a pinch of lemon zest over the pudding.
  3. Top with a quenelle/scoop of ice cream.
  4. Add the Almond Tuile and serve immediately.

Apple and olive oil cake with maple icing

Apple and olive oil cake with maple icing

Recently we made a birthday cake for our dear friend Alex, who loves anything with apples and sultanas. A little flick through one of our favourite cookbooks, Sweet by Yotam Ottolenghi and Helen Goh, provided us with this wonderful recipe. It nailed the brief (Alex loved it) but to be honest the real star of this cake is that maple icing. It’s dangerously good. Don’t make extra or you will end up smothering it on everything from crumpets to cupcakes. Best of all, it’s a quite simple cake to make. If you’re not a regular baker, this is a good recipe to try something new!

Apple and Olive Oil Cake

  • 100g sultanas
  • 275ml water
  • 350g plain flour
  • ½ tsp ground cinnamon
  • 1 ½ tsp bicarbonate of soda
  • 1 ½ tsp baking powder
  • ½ tsp salt
  • 800g Granny Smith apples
  • 200g caster sugar
  • 150ml olive oil
  • 2 large eggs, lightly beaten
  • 2 egg whites
  • scraped seeds of ½ vanilla pod
  • finely grated zest of 1 lemon

Maple Icing

  • 100g unsalted butter, at room temperature, plus extra for greasing
  • 100g soft light brown sugar
  • 85g maple syrup
  • 220g cream cheese
  1. Preheat the oven to 180°C
  2. Grease a 23cm round cake tin and line the base and sides with baking paper, ensuring the paper rises a few centimeters above the sides of the tin.
  3. Add the sultanas and 200ml of water to a small saucepan. Bring to a simmer and reduce the heat to low. Set aside once all the water has been absorbed.
  4. Sift the flour, cinnamon, bicarbonate of soda, baking powder and salt together into a large bowl.
  5. Peel and core the apples, then dice the fruit into 2-3cm chunks and set aside in a separate bowl.
  6. Place the sugar, olive oil, whole eggs, vanilla seeds and lemon zest in a bowl and beat with an electric mixer on a medium speed for 6-7 minutes, or until the mixture is pale and thick and has doubled in size.
  7. Use a spatula to fold in the diced apple, sultanas and the remaining 75ml of water. Add the sifted dry ingredients and fold in as well.
  8. Place the egg whites in a clean bowl and whisk until soft peaks form. Gently but thoroughly fold the egg whites through the cake mix, then scrape the batter into the tin. Level the top of the mixture with a spatula and bake for 60 minutes, or until a skewer inserted into the middle of the cake comes out clean. Set aside to cool in the tin.
  9. For the icing, place the butter, sugar and maple syrup in a bowl and beat with an electric mixer until pale and airy. Add the cream cheese a little at a time and continue to beat until smooth and thick.
  10. When the cake has completely cooled, use a large serrated knife to slice in half horizontally. Spread half the icing over the bottom layer of the cake and place the other layer on top. Spread the remaining icing over the top of the cake and using a spoon or palette knife, lightly flick the icing to create little icing spikes (or you could just leave it flat and smooth if you prefer). Leave the sides of the cake bare so the icing in the center can be seen.

Banoffee Pie

IMG_3454

One rainy weekend, we noticed we had too many bananas and the thought of baking a batch of banana bread didn’t really appeal to our sense of adventure. A quick raid of the pantry later, we realised we had the ingredients for a Banoffee Pie and so we decide to try something new! There’s nothing like spending a rainy day in the kitchen and having a comforting treat as your reward. Banoffee Pie is a well-loved English dessert, and you’ll see why, with its crunchy biscuit base, luxurious caramel layer and the freshness of bananas and cream, it’s very hard to stop at one slice. Best of all, this is actually a really simple dessert to make, no baking required and very minimal effort to assemble!

Dulce de Leche Filling:

  • 1 can (395g) condensed milk

Place the can of condensed milk in a saucepan of water, ensuring it is fully submerged. Bring to the boil and cook for 3 hours, checking every 20 minutes to see if the water needs to be refilled, so the can stays completely submerged. Remove the can from the water and cool to room temperature before opening.

Crust:

  • 50g butter
  • 100g dark chocolate
  • 40ml Thickened Cream
  • 200g sweet biscuits (e.g. digestive biscuits)
  • 80g slivered almonds or blanched almonds
  1. Toast the almonds in a moderate oven until lightly browned. Once cool, roughly chop the almonds and set aside.
  2. In a food processor, grind the biscuits until they resemble breadcrumbs.
  3. Melt the chocolate, cream and butter in a bowl set over a saucepan of simmering water, or in the microwave.
  4. Add the melted chocolate mixture to the ground biscuits and almonds and mix well.
  5. Press the mixture into the base and sides of a 25cm tart mould, ensuring the mixture is evenly distributed. Refrigerate for at least 30 minutes to set the crust.

Chantilly Cream:

  • 250ml thickened cream
  • 2 Tablespoons icing sugar

Whip the cream and icing sugar together with an electric mixer until stiff peaks form.

To Assemble:

  • Crust
  • Dulce de Leche Filling
  • 2 large bananas, sliced into ¾ cm slices
  • Chantilly Cream
  1. Spread the Dulce de Leche filling across the base of the tart.IMG_0310
  2. Cover the caramel with sliced bananas.FullSizeRender
  3. Put the Chantilly cream in a piping bag, and cut the end of the bag into a 1.5cm opening. Cover the top of the pie with little dollops of cream, until completely covered.
  4. Garnish with edible flowers of your choice. Serve immediately or refrigerate until serving.

Opera Cake

Opera Cake

Opera Cake

One of Patrick’s favourite things to do in the kitchen is make buttercream and decorate cakes – he even has an entire instagram page devoted to his cake decorations (Check it out here: www.instagram.com/pattyjocakes). So when we decided to bake a cake for a friend, buttercream was at the forefront of our minds. This decadent cake consists of layers of sponge cake, buttercream and chocolate ganache, topped with a layer of chocolate glaze. We chose to serve our cake sliced, decorated with edible gold paint, but traditionally the cake would be served whole, with the word “Opera” piped on top in chocolate ganache. Either way, it’s a decadent hit of chocolate and coffee goodness best to share with friends so you aren’t tempted to go for a second slice!

Joconde Sponge Cake:

  • 85g   almond meal
  • 75g   icing sugar
  • 25g   plain flour
  • 120g eggs (around 2 medium eggs)
  • 80g   egg whites
  • 10g   caster sugar
  • 30g   butter, melted

Preheat oven to 200°C. Mix together the almonds, icing sugar and flour in a bowl. Add the eggs a little at a time and mix well until the batter becomes smooth and pale. In a separate bowl, whip the egg whites and sugar together until they form stiff peaks. Gently fold the batter into the whipped egg whites, then fold in the melted butter.

Spread the mixture on a baking sheet lined with baking paper to 5mm thickness, smoothing the mixture to ensure an even layer across the baking sheet. Bake for 15 minutes, or until the cake is golden and firm to the touch. Remove form the baking sheet and cool on a wire rack.

Coffee Buttercream:

  • 5g instant coffee
  • 15ml boiling water
  • 250g sugar
  • 60ml water
  • 90g egg yolks
  • 300g butter, softened
  • 4ml vanilla extract
  1. Dissolve the instant coffee in 15ml of boiling water and set aside to cool.
  2. Combine the sugar and 60ml water in a saucepan and place over a medium heat, stirring to dissolve the sugar. Continue to boil until the sugar syrup reaches 115°
  3. While the syrup is boiling, beat the egg yolks until they are thick and pale.
  4. As soon as the syrup reaches 115°C, pour it slowly into the egg yolks, continuing to whisk constantly.
  5. Continue to beat until the mixture has completely cooled. The yolks should be very thick and pale.
  6. Continue beating the mixture as you add the butter a little at a time.
  7. Beat in the vanilla and coffee mixture. If the buttercream is too soft to spread, refrigerate until it becomes firmer.

Dessert Syrup

  • ½ cup sugar
  • ½ cup water
  • 1 tsp instant coffee

Combine sugar and water in a saucepan and bring the boil, stirring until sugar dissolves. Add the coffee and stir well.

Chocolate Ganache

  • 200g dark chocolate, chopped
  • 250g double cream

Melt the chocolate in a bowl set over a hot water bath. Heat the cream and add to the chocolate. Mix well and chill.

Opera Glaze

  • 350g dark chocolate couverture
  • 60g peanut oil

Melt chocolate in a bowl set over a hot water bath. Stir in the oil. Allow to cool a little before using. (Makes a thin coating which sets solid but can easily be cut with a hot knife)

To assemble:

  • Joconde Sponge Cake
  • 50g dark chocolate, melted
  • Dessert Syrup
  • Coffee Buttercream
  • Chocolate Ganache
  • Opera Glaze
  1. Cut the sponge into 3 equal rectangular portions. Spread one piece with a think layer of dark chocolate, then refrigerate to set the chocolate
  2. Remove the chocolate coated sponge from the refrigerator, turn chocolate side down and brush with the Dessert Syrup.
  3. Spread a layer of Coffee Buttercream above the sponge rectangle, about 5mm thick.
  4. Place the second sponge rectangle on top. Brush with the syrup and then spread a thin layer of Chocolate Ganache on top.
  5. Top with the third and final layer of sponge. Brush with the syrup and spread with a layer of Coffee Buttercream, about 5mm thick. Smooth the top carefully with a palette knife.
  6. Refrigerate or freeze until firm. The cake must be quite cold so the warm glaze doesn’t melt the buttercream.
  7. Place the cake on a wire rack over a tray and pour over the warm Opera Glaze. Smooth the surface with a palette knife and refrigerate the cake until the glaze has set.
  8. Remove cake from the rack and trim the sides of the cake with a hot knife.

To Serve:

  • ¼ tsp gold powder
  • ½ tsp gin

If you like, cut the cake into rectangular slices approximately 5cm x 10cm. Mix together the gold powder and gin, and using a fine paintbrush, decorate the top of each slice with a triangle of golden glaze. Use a piece of baking paper cut to purpose as a guide to ensure a uniform triangle on each slice of cake.

Alternatively, using chocolate ganache, you could pipe the word “Opera” onto the top of the entire cake and serve whole.

Louise Cake

20180409_103155
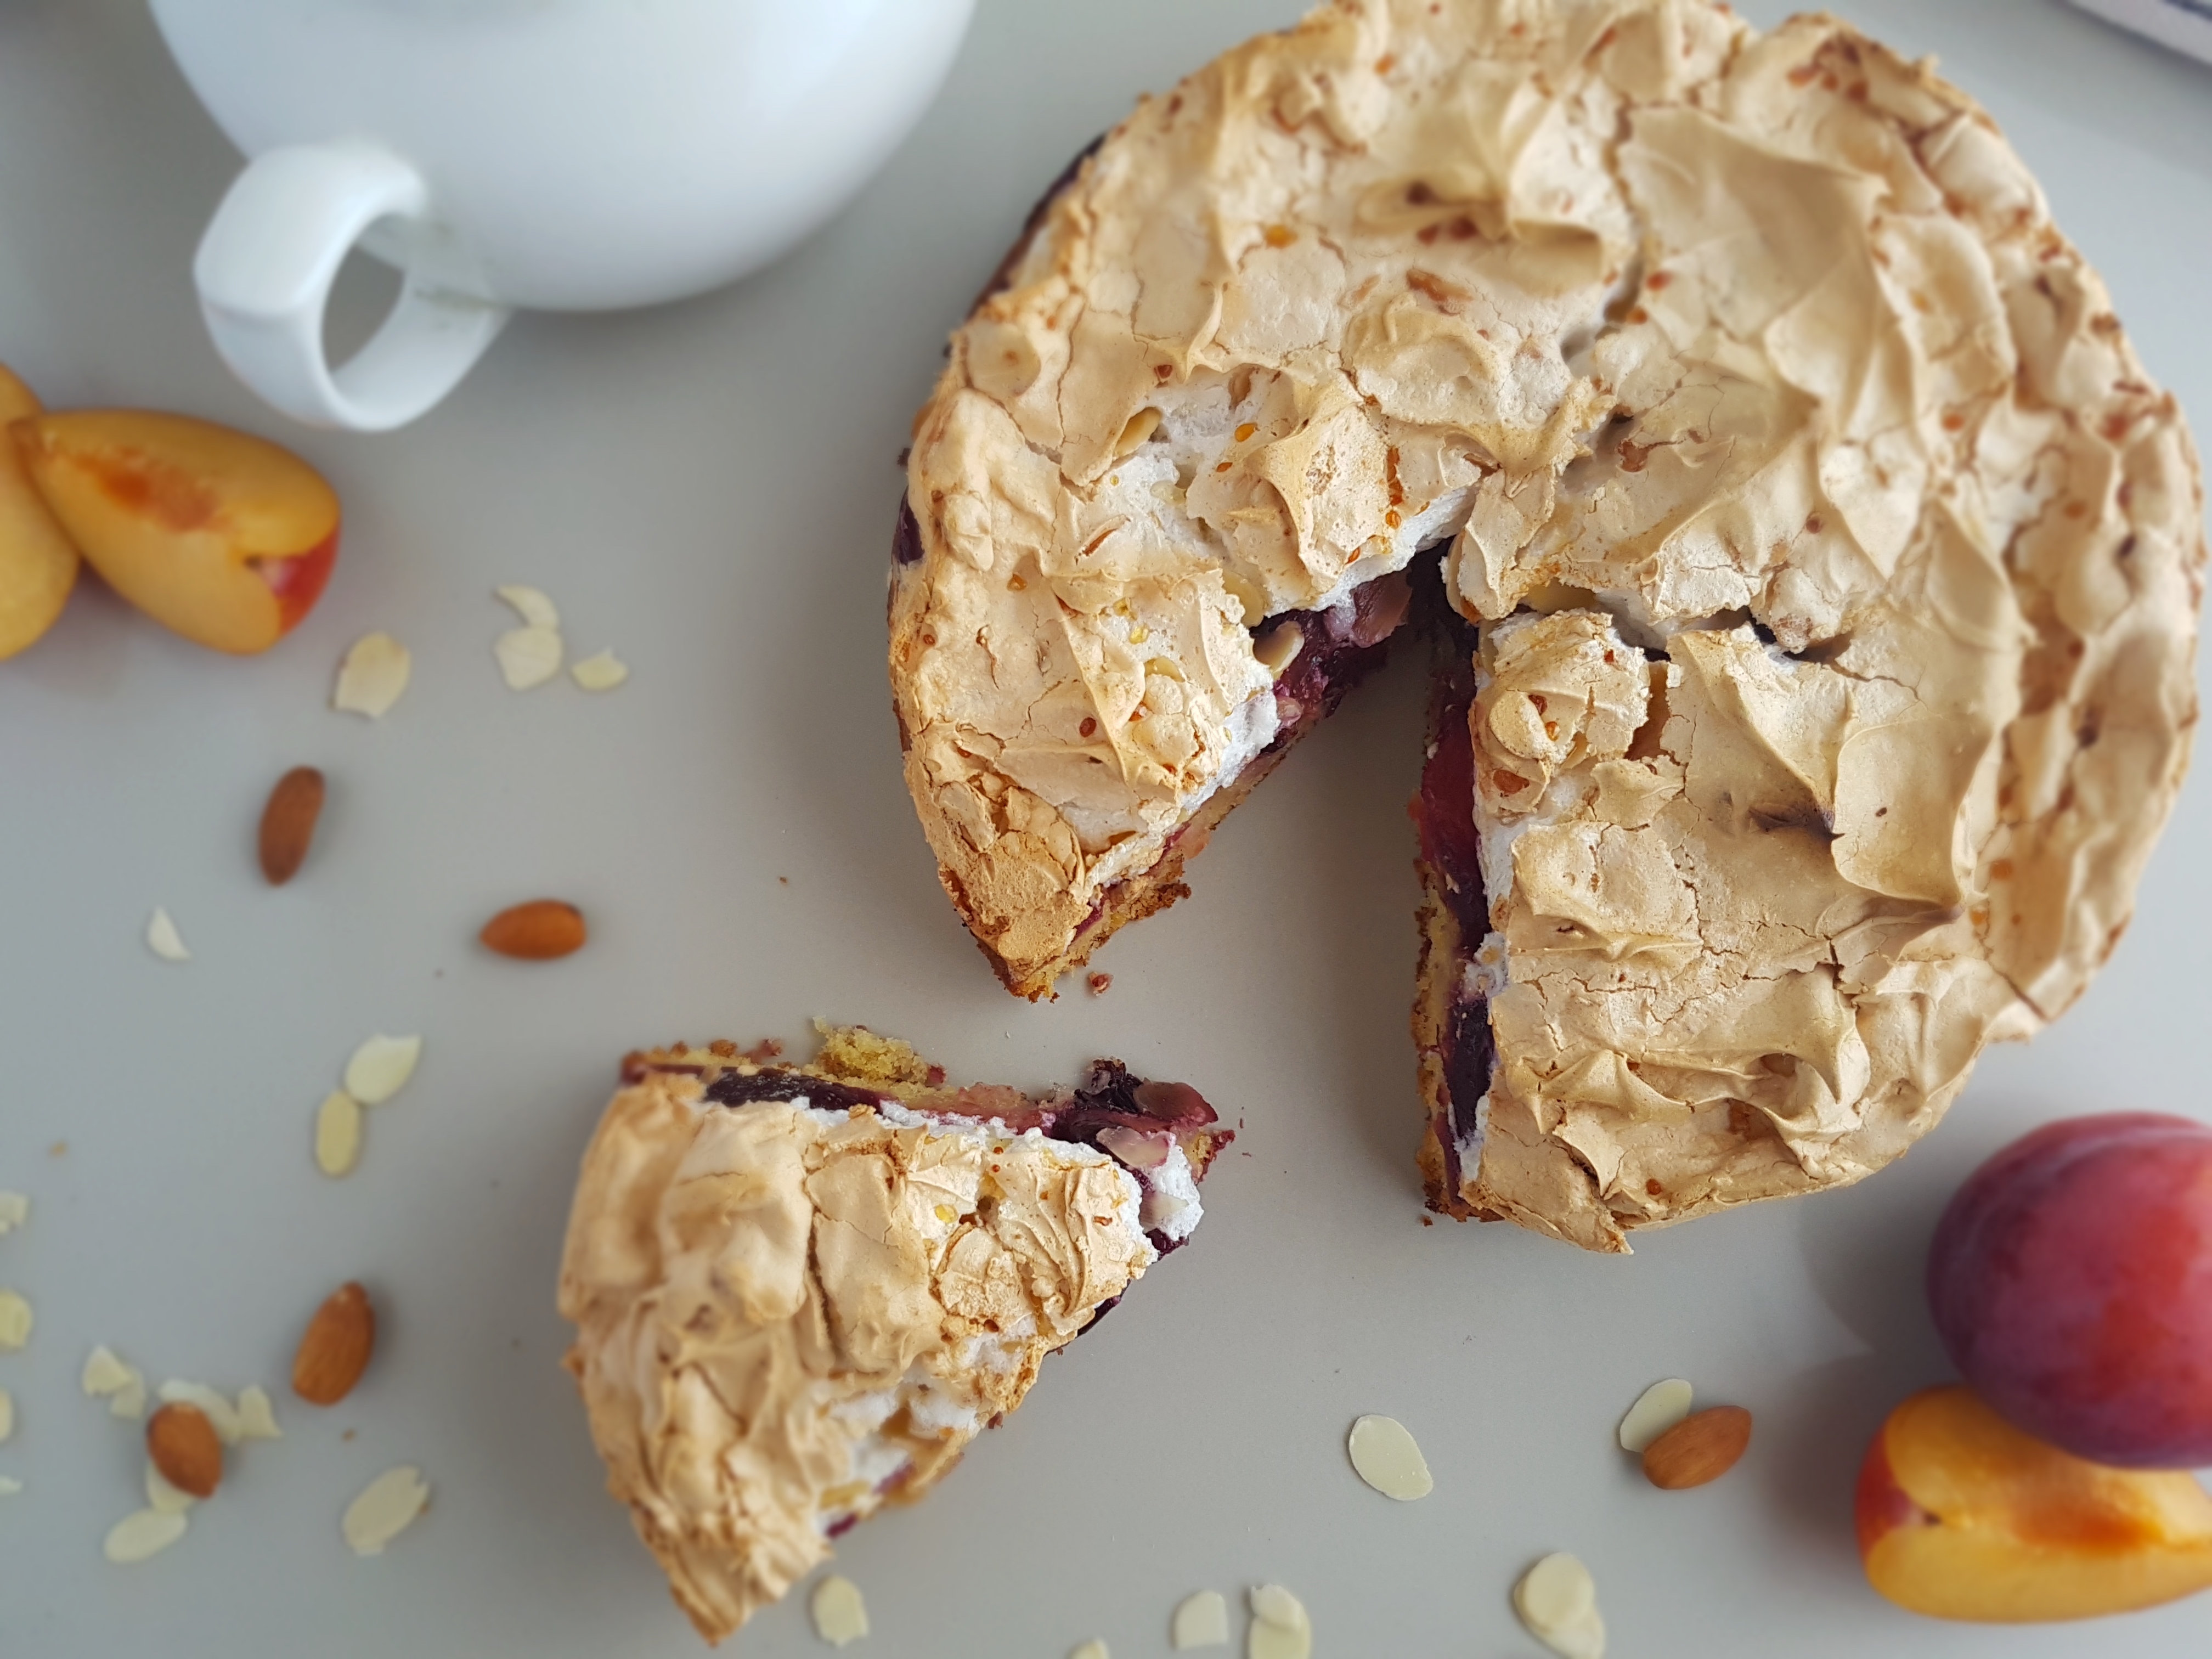
Once again we’re adapting a recipe from Ottolenghi and Goh’s Sweet. They in turn have been inspired by the traditional Louise cake from New Zealand, which is a slice with a cake layer topped with raspberry jam and a coconut meringue. Ottolenghi and Goh’s version uses fresh fruit; you could use any stone fruit which is in season, just be sure it’s ripe but not too soft. We love the addition of flaked almonds to the meringue, as it adds a delicious crunch to the fluffy meringue and syrupy fruit. The cake is fairly rich so you could bake it in a square tin and cut into small squares to serve, or bake in a round tin as we did for a more decadent serving.

Ingredients:

  • 125g unslated butter, at room temperature, cut into 2cm cubes
  • 100g caster sugar
  • finely grated zest of 1 lemon
  • 3 large egg yolks
  • 125g plain flour
  • 1 ½ tsp baking powder
  • ¼ tsp salt
  • 20g desiccated coconut
  • 80ml whole milk
  • 1 tsp vanilla extract
  • 5 medium plums (450g), ripe but firm (or any stonefruit in season)

For the meringue:

  • 60g flaked almonds
  • 140g egg whites
  • 1/8 tsp salt
  • 185g caster sugar
  • 1 tsp vanilla extract
  • 1 tsp white wine vinegar
  • 1 tsp cornflour

Method:

  1. Preheat the oven to 170°C/Gas mark 3.
  2. Spread the flaked almonds on a baking tray and toast for 10 minutes, or until they are a light brown colour. Remove from the oven and set aside.
  3. Increase the oven temperature to 185°C/Gas mark 5. Using a 20cm square or 23cm round tin with removable base, line the base and sides with baking paper.
  4. Place the butter, sugar and lemon zest in a bowl and beat together until pale and creamy. Add the egg yolks one at a time, beating until combined. Sift the flour, baking powder and salt together into a separate bowl. Add the coconut and stir to combine. Gradually add the dry ingredients to the butter mixture, beating on a low speed, and alternating with the milk and vanilla. Spoon the batter into the prepared tin and smooth the top. Place in the oven and cook for around 25 minutes. The cake is cooked when a skewer inserted in the middle comes out clean.
  5. Slice each plum vertically in half and discard the stones. Slice each half into four segments so you have 8 segments per plum.
  6. Once the cake is cooked, remove from the oven and turn the temperature up to 200°C/Gas mark 6. Place the plum segments on top of the cake, forming a layer of fruit across the surface. Be sure not to overlap the plums though, or the fruit layer will become too watery.
  7. To make the meringue, whisk together the egg whites and salt on a medium-high speed, until soft peaks form. Add the sugar a little at a time, and continue to whisk until the egg whites are stiff and shiny. Add the vanilla, vinegar and cornflour and whisk again until combined. Fold in the toasted almond flakes.
  8. Spoon the meringue into the cake tin, on top of the fruit layer and spread out evenly. Create waves and peaks in the meringue by dabbing a spatula into and out of the mixture. Place in the oven and immediately lower the temperature to 180°C/Gas mark 4. Bake for 35 minutes or until the meringue has formed a hard crust and is just beginning to brown. Remove from the oven and cool the cake in the tin for at least 30 minutes before removing the base of the tin and removing the baking paper to serve.

Anzac Biscuits 3 ways

Anzac Biscuit Ice Cream Sandwich

Anzac Biscuits 3 ways

Today is Anzac Day in Australia and New Zealand, a day to honour the men and women of the armed forces of our countries. One of the most famous of Australian foods is the humble Anzac biscuit, which had its origins in World War 1. The biscuits were sent to soldiers overseas and were designed to keep well during transit. These biscuits are still very popular today due to their chewy texture and slightly caramel taste.

We decided to bake a batch to celebrate the holiday. Then after watching Chef’s Table on Netflix we were inspired by Momofuku Milk Bar’s Christina Tosi to try infusing the flavour of the biscuit in an ice cream. Then we went one step further and turned the biscuits and ice cream into an ice cream sandwich! These are the resulting recipes, and it’s up to you how far along the journey you travel. You could just make the Anzac biscuits, or continue on to make the ice cream, or the ice cream sandwiches.

The biscuit recipe makes about 28 biscuits and you only need 10 of these for the ice cream recipe, so you’ll have plenty of delicious Anzac biscuits to share with friends and family (or make two batches and take some to work!)

Anzac Biscuits:

  • 150g plain flour
  • 165g caster sugar
  • 100g rolled oats
  • 90g desiccated coconut
  • 125g unsalted butter
  • 90g golden syrup
  • ½ tsp bicarbonate of soda (baking soda)
  • 1 Tbsp boiling water
  1. Preheat the oven to 180° Line 2 large baking trays with baking paper.
  2. Sift the flour into a large bowl, and stir in the other dry ingredients. Make a well in the centre of the mixture.
  3. Place the butter and golden syrup in a small saucepan over a low heat, stirring until the butter has melted and the mixture is well combined. Remove from the heat. Dissolve the bicarbonate of soda in the boiling water and immediately add to the butter mixture. Add the mixture to the dry ingredients and mix well with a wooden spoon.
  4. Roll level tablespoons of the mixture into balls and place on the prepared trays, leaving room for each to spread as it cooks. Flatten each ball slightly with the bottom of a glass or your fingers.
  5. Bake for 15-20 minutes until golden brown. The biscuits will still be soft to the touch. Leave on the tray for 5 minutes to crisp up before transferring to a wire rack to cool.

Anzac Biscuit Ice Cream:

  • 10 Anzac biscuits
  • 250ml (1 cup) full cream milk
  • 3 Tbsp (60 ml) golden syrup
  • 5 egg yolks, lightly whisked
  • 375ml thickened (whipping) cream
  1. Using a mortar and pestle or a food processor, break the biscuits apart into crumbs. Place half of the crumbs into a mixing bowl and set the other half aside.
  2. Warm the milk in a saucepan until just simmering. Pour the milk into the mixing bowl with the biscuit crumbs and stir well. Allow to steep for an hour. Strain the mixture through a fine sieve back into the saucepan, wringing out all the liquid from the crumbs. Discard the solids. Add the golden syrup to the saucepan and bring the milk mixture back to a simmer, stirring well to combine.
  3. Place the egg yolks in a mixing bowl. Pour the warm milk mixture in a steady stream into the yolks, whisking continuously so the eggs don’t curdle. Pour the mixture back into the saucepan, stirring continuously, and cook over a low heat until the mixture thickens. The mixture is ready once it is thick enough to coat the back of a wooden spoon. Set aside for 10 minutes to cool, then refrigerate for at least 2 hours, or overnight.
  4. Churn the mixture in an ice cream maker to the manufacturer’s instructions. Just before the ice cream is set, add half of the remaining biscuit crumbs and stir through the ice cream. Keep the other half for garnishing when serving.
  5. Transfer the ice cream to a container, cover and freeze for at least an hour to set.
  6. Serve a few scoops of the ice cream in a small bowl, covered with a dusting of the reserved biscuit crumbs.

Anzac Biscuit Ice Cream Sandwich:

  • 2 Anzac biscuits
  • 1 scoop Anzac Biscuit Ice Cream

Take a scoop of ice cream and place on the flat side of an Anzac biscuit. Add another biscuit to the top, flat side against the ice cream and gently press together. Smooth out the edges of the ice cream filling with the flat side of a knife and serve immediately.

Grilled Figs with Almond Crisp and Verjuice Sabayon

20180331_221618
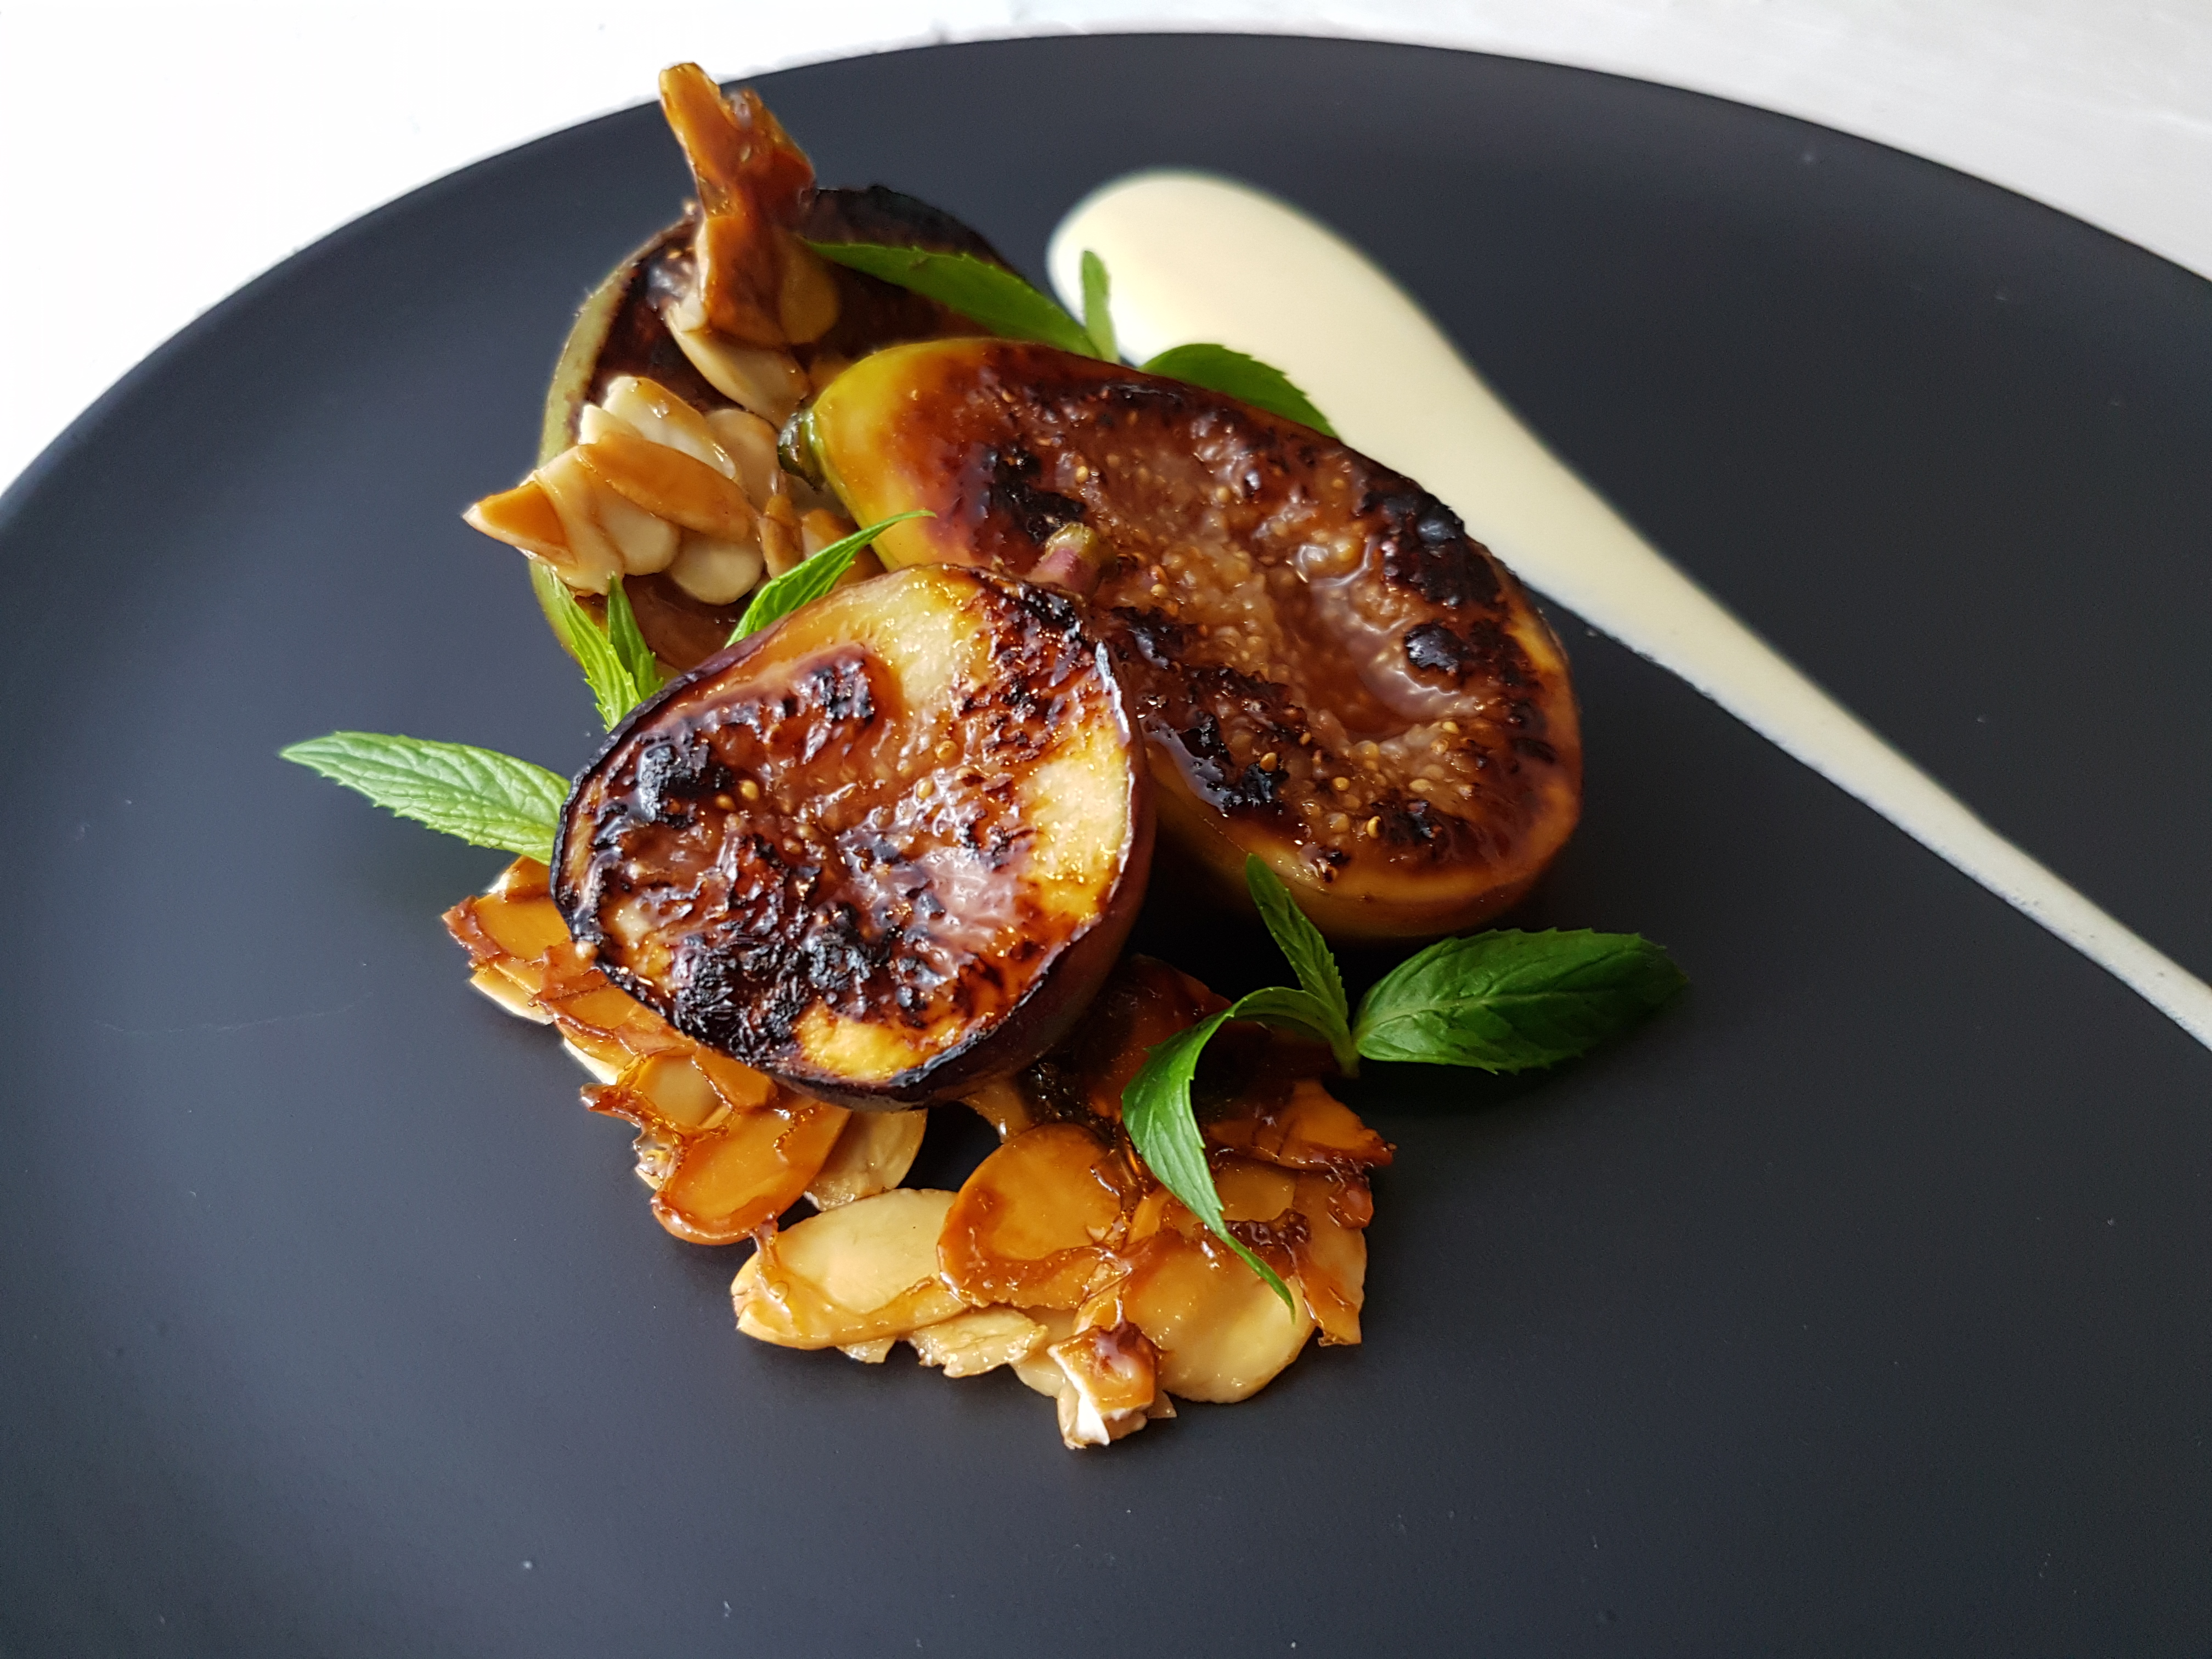
Figs are in season here in Sydney and every store seems to have plump, juicy figs on display. We couldn’t resist any longer, and decided to try Maggie Beer’s grilled fig recipe. Simply glazing and grilling the figs is a great way to highlight the great quality produce. The Almond Crisp and Verjuice Sabayon add texture and tartness respectively, but don’t detract from the real star of this simple dessert.

We have adapted this recipe from one in Maggie Beer’s Maggie’s Verjuice Cookbook.

Serves four people.

Ingredients:

  • 6 ripe figs
  • 3 tsp vino cotto
  • 2 tsp extra virgin olive oil
  • mint leaves, to garnish (optional)

Almond Crisp:

  • 60g flaked almonds
  • 35g brown sugar
  • 25ml verjuice

Verjuice Sabayon:

  • 1 cup (250ml) verjuice
  • 2 egg yolks
  • 30g caster sugar

Method:

  1. Preheat oven to 180°
  2. Place the Almond Crisp ingredients in a bowl and toss to combine. Spread the mixture on a baking tray lined with baking paper. Bake for 18 minutes, rotating the tray halfway through the cooking time. Watch carefully in case the sugar burns. Once the almonds are a pale golden colour, remove the tray from the oven and set aside to cool. Break into shards.
  3. To make the sabayon, simmer the verjuice in a saucepan until reduced to 100ml. Set aside to cool. Fill a saucepan one-third full of water and bring to a simmer, then reduce the heat to low. Place the egg yolks and sugar in a heatproof bowl that fits over the saucepan without touching the water. Whisk the yolks and sugar together, slowly adding the cooled verjuice a little at a time. Continue whisking for around 8 minutes, or until the sabayon thickens to the point where it forms ribbons and holds its shape when lifted with a spoon. Remove from the heat and cover the surface with cling film.
  4. Preheat a barbecue plate or chargrill pan to high heat.
  5. Mix the vino cotto and olive oil together. Cut the figs in half lengthways and brush the cut surface with the vino cotto mixture. Place the cut sides down on the very hot chargrill pan, and cook until well caramelised, around 2-3 minutes.
  6. On one side of each plate, arrange three fig halves and a shard or two of the Almond Crisp. On the other side, place a dollop of sabayon, and smear across the plate. Alternatively, serve the sabayon in a ramekin on the side.


Glazed Chocolate Mousse and Cherry Sorbet with Almond and Pistachio Crumb

20180307_213757Here’s another Recipe Road invention we created for our friend’s birthday party a few weeks ago. We wanted a rich chocolate dessert to finish the night, but hoped to cut through the richness with something fresh and light. As we had featured cherries in our main dish (Roasted Pork Rack with Cherries and Onions), we decided to link the two dishes by making a cherry sorbet. The combination worked beautifully, with the sorbet cleansing the palate between each bite of the rich chocolate mousse. The almond and pistachio crumb adds a bit of texture and crunch to the dish so it has everything, really! We hope you enjoy.

Serves 6 people.

Chocolate Mousse:

  • 225g dark chocolate (70% cocoa), chopped
  • 160g butter
  • 6 egg yolks
  • 110g icing sugar
  • 90g cocoa powder
  • 3 egg whites
  • 3 Tbsp sugar
  • 90ml thickened cream, whipped

Melt the chocolate and butter together in a bowl set above a pan of simmering water. Once melted and combined, set aside to cool. Once the mixture has cooled to room temperature, stir in the egg yolks with a spatula. Sift the icing sugar and cocoa powder into the chocolate mixture, and stir well to combine. In another bowl, beat the egg whites and sugar to make a soft peak meringue. Gently fold the meringue and then the whipped cream into the chocolate mixture. Pour the mixture into a 1 inch-deep baking tray lined with cling film and transfer to the freezer to set.

Cherry Sorbet:

  • 100g raw sugar
  • 300g cherries (fresh or frozen)
  • 1 egg white
  • 550g ice cubes

Pour sugar into a sturdy food processor (we used a thermomix). Mill on a high speed for 10 seconds (Thermomix speed 9). Add the cherries, egg white and 350g of the ice cubes and blend for 20 seconds, starting at a low speed and gradually increasing to maximum speed (Thermomix speed 10). Add the remaining ice and blend for around 1 minute more, until the mixture has reached a smooth consistency. You may need to scrape down the sides of the bowl with a spatula. Store in an airtight container in the freezer until ready to serve.

Golden Honey Glaze:

  • ½ tsp gin
  • 2 Tbsp honey
  • ¼ tsp gold powder

Mix the gin and honey in a bowl, once the mixture becomes thinner, add the gold powder and mix well.

Toasted Golden Almonds:

  • 42 whole almonds, halved lengthways
  • ½ of the Golden Honey Glaze

Toast the halved almonds and then brush with the golden honey glaze. Set aside on a tray to dry.

Chocolate Glaze:

  • 2 gelatine sheets (8g)
  • 50g water
  • 85g sugar
  • 35g cocoa powder
  • 45g cream

Bloom the gelatin by soaking it in cold water. In a small saucepan, combine the water, sugar and cocoa powder, and bring to the boil, then remove from the heat immediately. In a separate saucepan, warm the cream, then combine it with the chocolate mixture. Add the gelatin, stir to combine and set aside. Cool the mixture to room temperature to glaze.

Glazed Chocolate Mousse

  • Chocolate Mousse
  • Chocolate Glaze
  • Toasted Golden Almonds

Once the mousse is set, use a 6cm round cookie cutter to cut 6 rounds from the mousse. Rinse the cutter in warm water between cutting each round of mousse. Set the rounds on a cooling rack and pour a little of the glaze over each one, making sure the sides are fully covered. Remove the rounds from the cooling rack and set on a tray lined with baking paper. Decorate the sides of each mousse round with the Toasted Golden Almonds.

 Almond and Pistachio Crumb:

  • ¼ cup almonds
  • ¼ cup pistachio kernels
  • 5 savoury crackers (we used Eton crackers)
  • A handful of cornflakes

Combine all ingredients in a food processor and blend to a rough crumb consistency. Set aside.

To serve:

  • ½ of the Golden Honey Glaze
  • Almond and Pistachio Crumb
  • Glazed Chocolate Mousse
  • Cherry Sorbet
  • 18 micro mint leaves

Across one side of each plate, paint a 4cm stripe of Golden Honey Glaze. On the opposite side of the plate, place a small pile of Almond and Pistachio Crumb, and create a small well in the centre of the pile. Place the Glazed Chocolate Mousse on the stripe. Quenelle the Cherry Sorbet and place in the well of the crumb. Decorate with 3 micro mint leaves and serve.

Lime Yoghurt Cake with Rosewater and Pistachios

IMG_5344
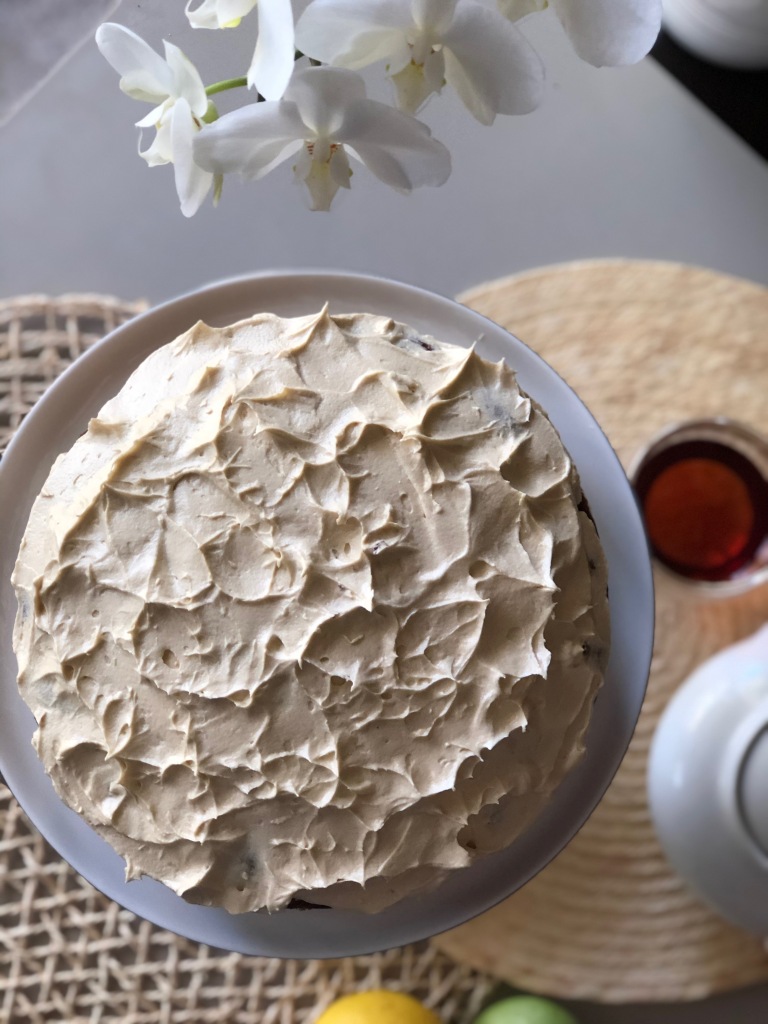
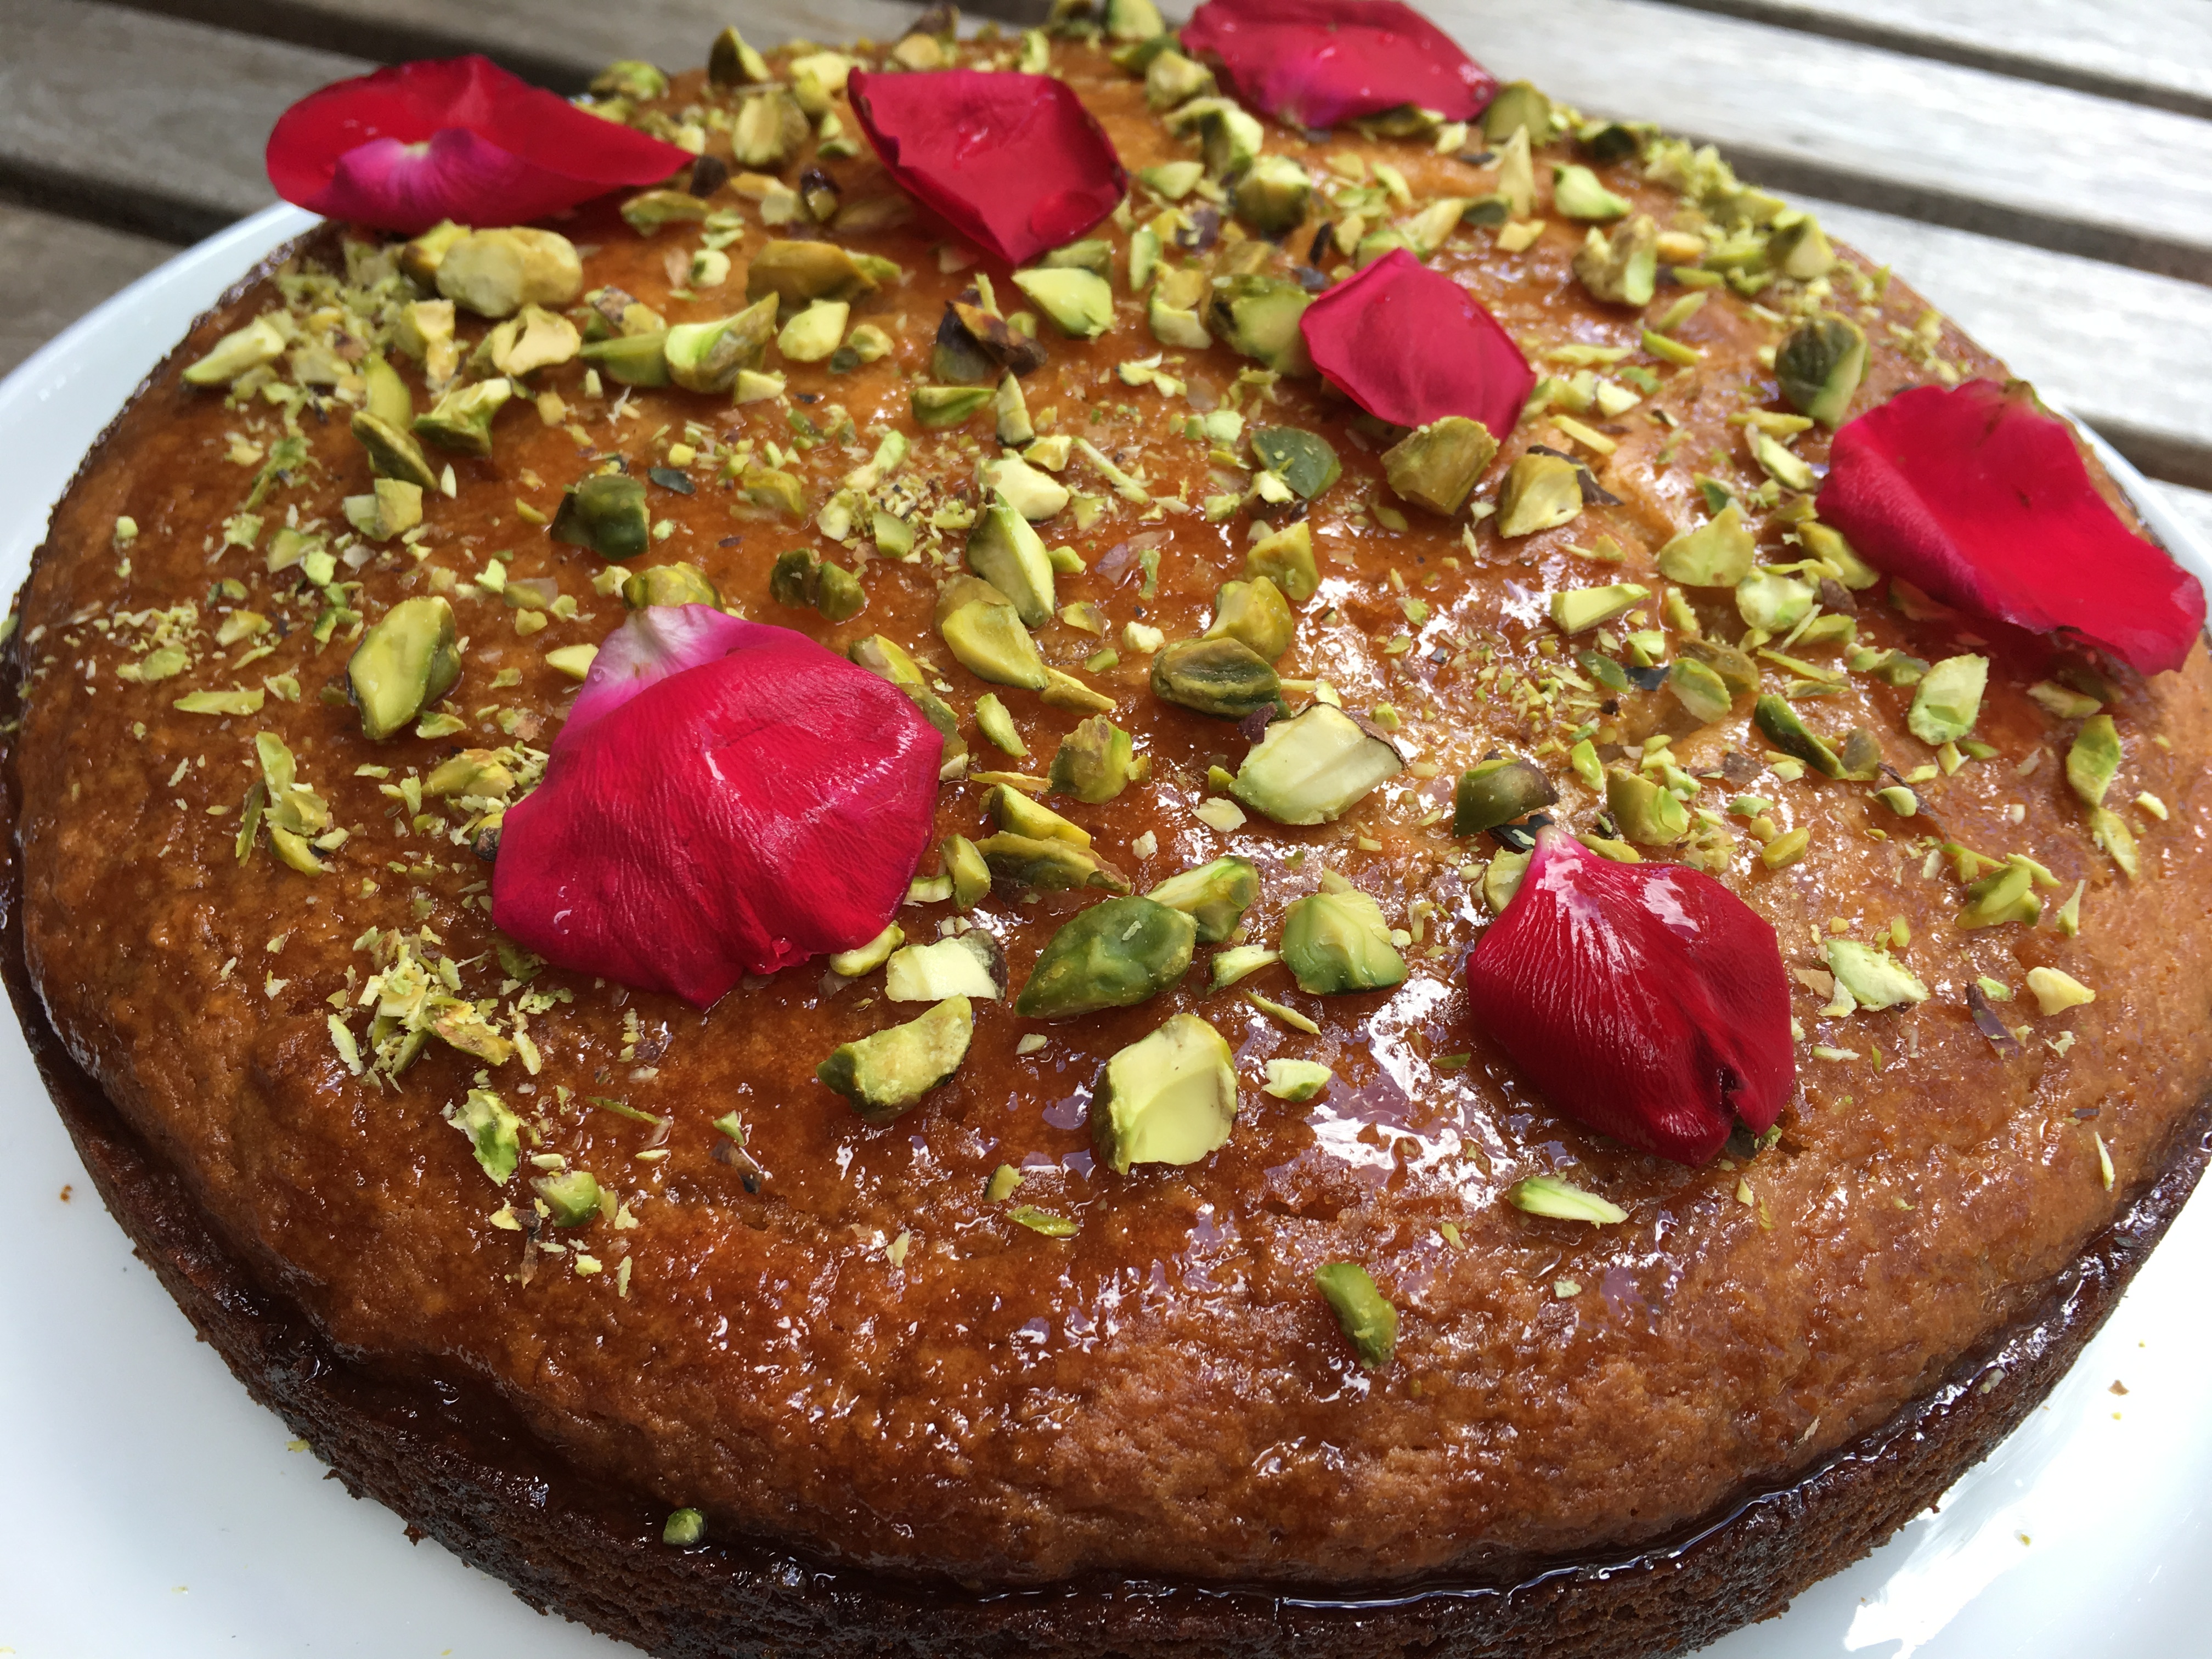
We were so impressed with this cake that we decided to include it on our blog even though we hadn’t originally intended to. Ian baked this to take to work for a morning tea, and it was not only easy to make but such a pretty cake that it was almost a shame to eat it. The Middle Eastern flavours of pistachio, rosewater and lime are a great combination, and the yoghurt keeps the cake moist. We had some leftover ground pistachios from making our Madeleines a few weeks ago, but if you’d rather use almond meal that would work just as well. The cake was a hit at work, by the way!

This recipe is adapted from one by Rachel Allen

Ingredients:

  • 225g self-raising flour
  • 1 tsp baking powder
  • a pinch of salt
  • 75g ground pistachios or almonds
  • 100g caster sugar
  • 2 eggs
  • 50g honey
  • 250ml natural yoghurt
  • 150ml sunflower oil
  • finely grated zest of 1 lime
  • 40g chopped pistachios
  • rose petals, to decorate

For the syrup:

  • 150ml water
  • 100g caster sugar
  • juice of 1 lime
  • 1-2 tsp rosewater

Method:

  1. Preheat the oven to 180°C/350°F/Gas mark 4, and grease a 22cm round springform cake tin.
  2. Sift the flour, salt and baking powder into a large bowl. Add the ground pistachios or almonds and caster sugar, and mix together.
  3. In another bowl, mix together the eggs, honey, yoghurt, sunflower oil and lime zest.
  4. Make a well in the middle of the dry ingredients, and gradually pour in the wet ingredients, mixing together with a whisk until just combined.
  5. Add a few of the chopped pistachios to the mix, if you wish, or retain all of them for decorating.
  6. Pour the cake mixture into the greased tin and bake for 50 minutes, or until a skewer stuck into the middle of the cake comes out clean.
  7. Remove cake from the oven and allow to cool for 20 minutes in the tin. Turn out onto a wire rack.
  8. While the cake is cooling, make the syrup. Combine the water and sugar in a small pan and bring to the boil. Once the syrup has reduced by half, about 5 minutes, add the lime juice and boil for another 2 minutes. Set aside, and once it has cooled, add rosewater to taste.
  9. Using a skewer, make holes all over the top of the cake, then spoon the syrup across the cake. Scatter the pistachios across the top, and then leave to sit for an hour.
  10. Decorate with rose petals just before serving.

Banana Napoleon with Coconut Snow and Banana Caramel

FullSizeRender
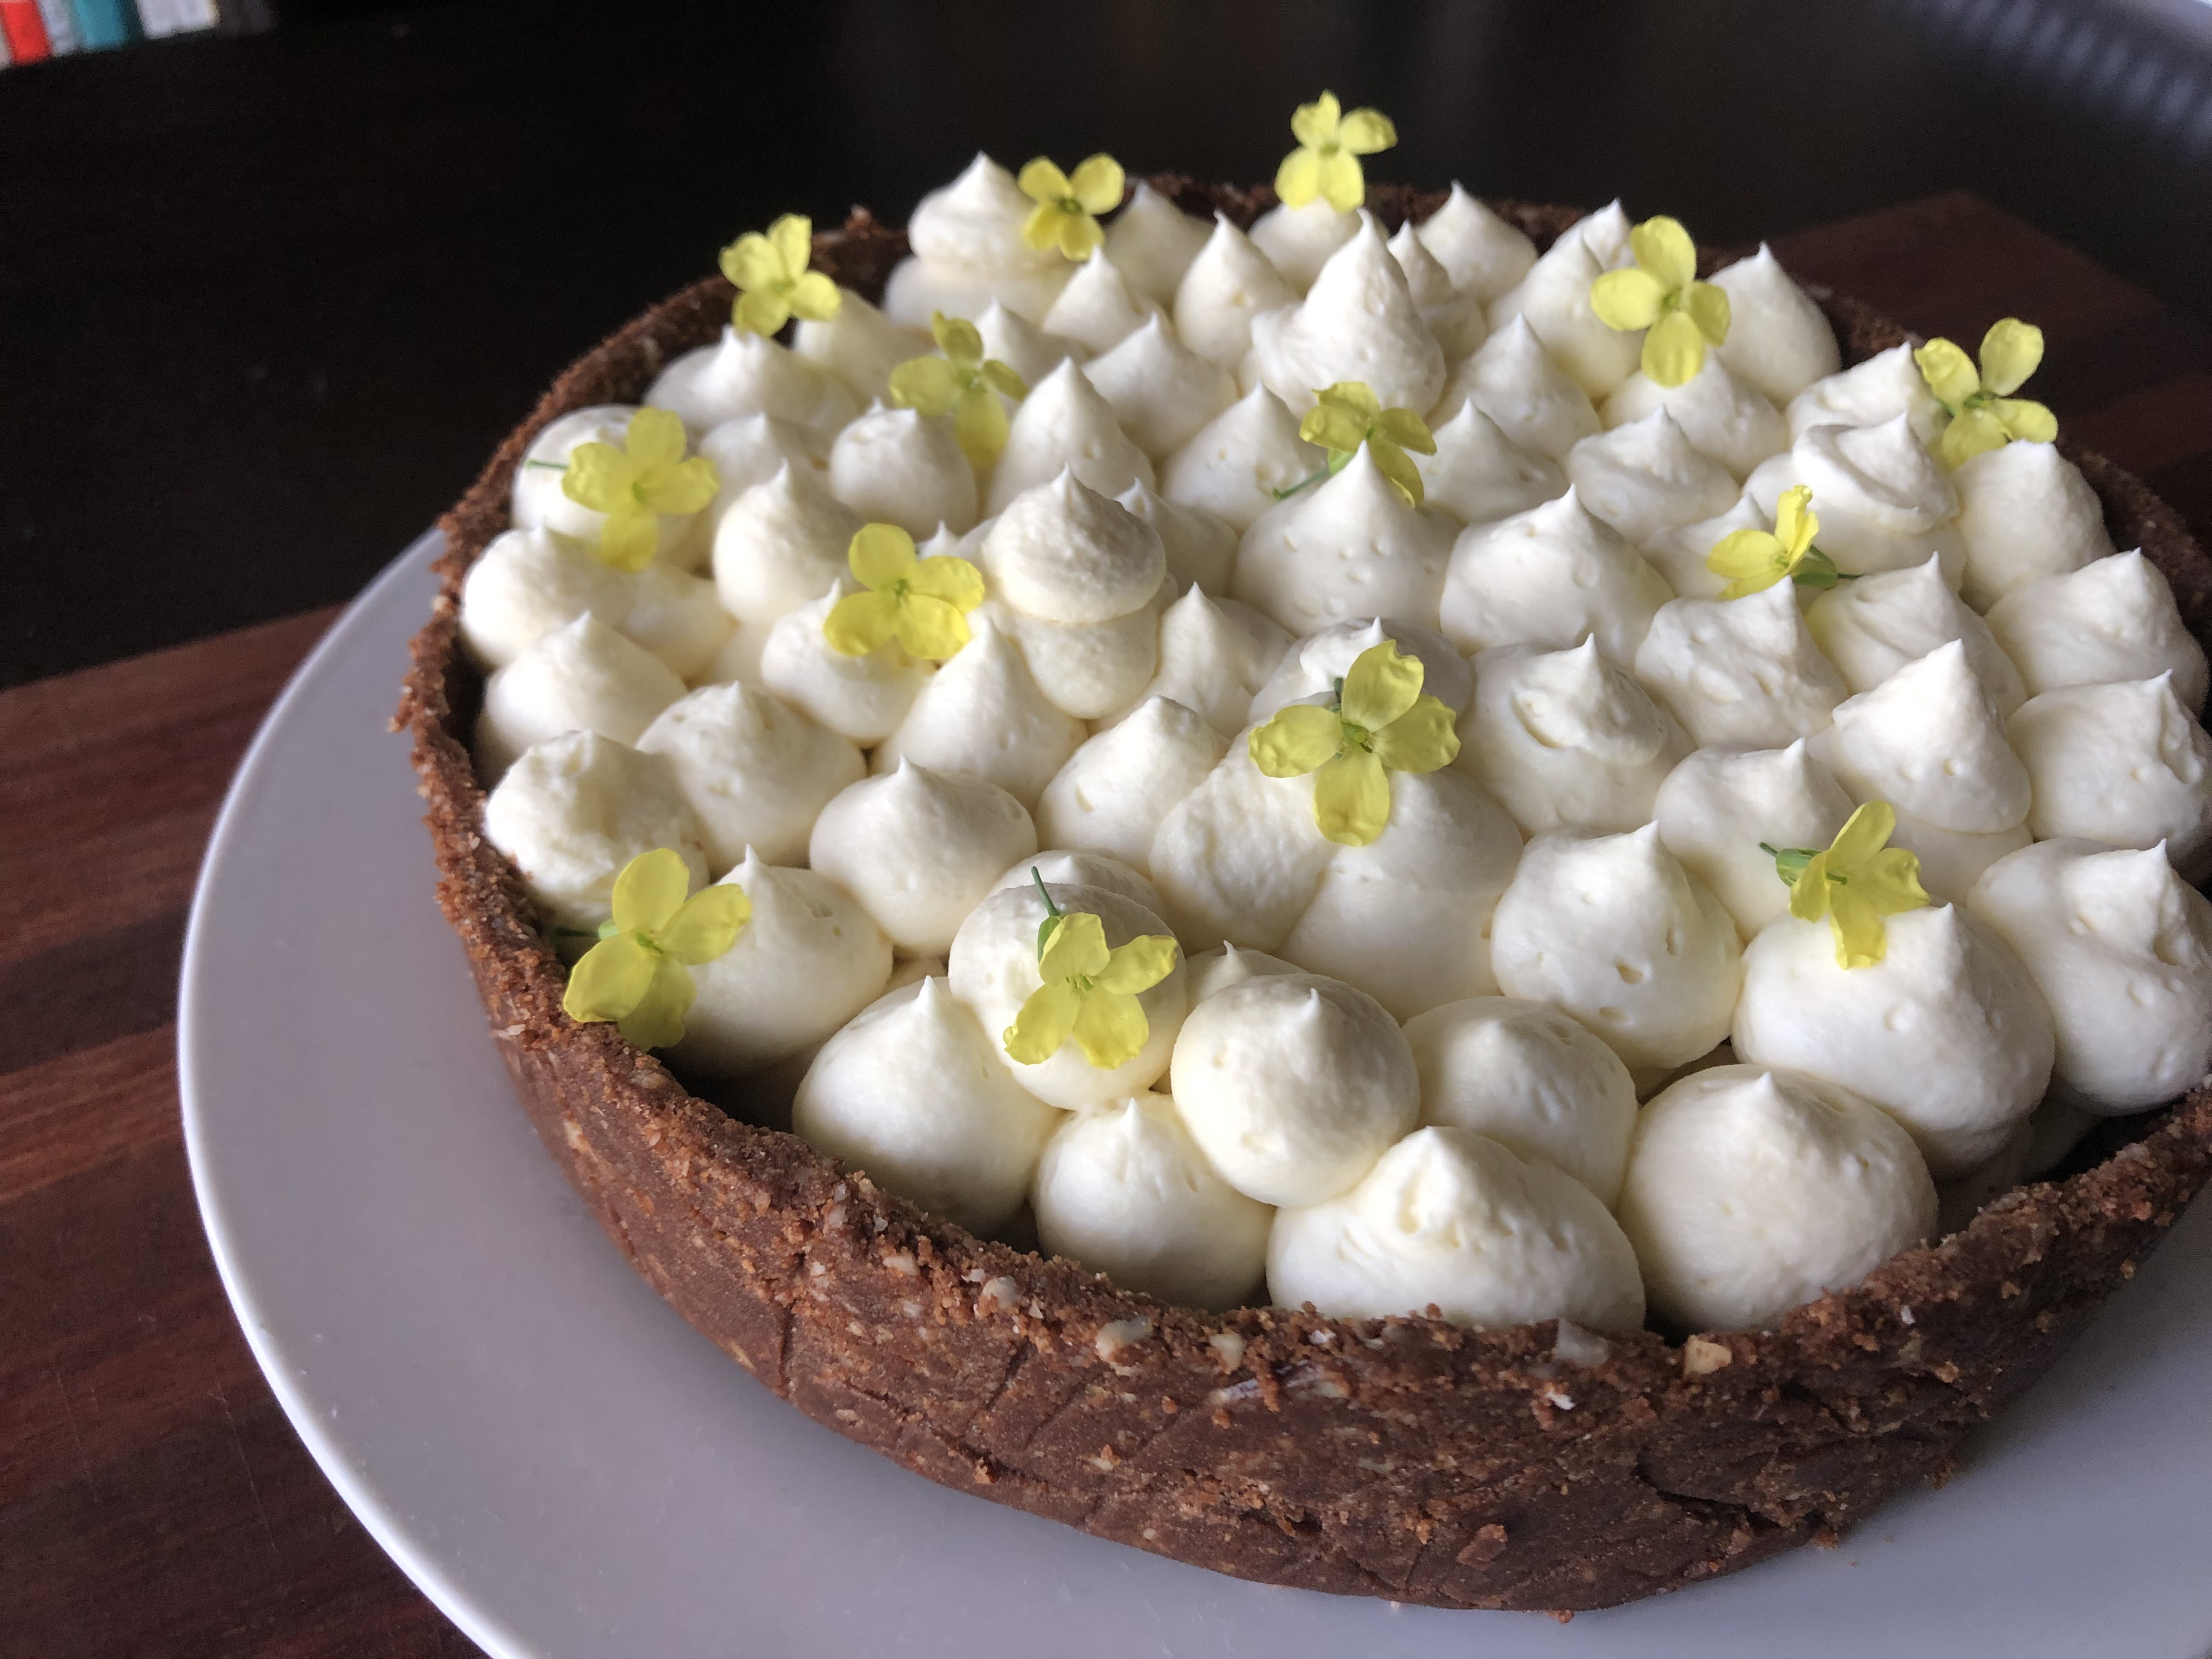
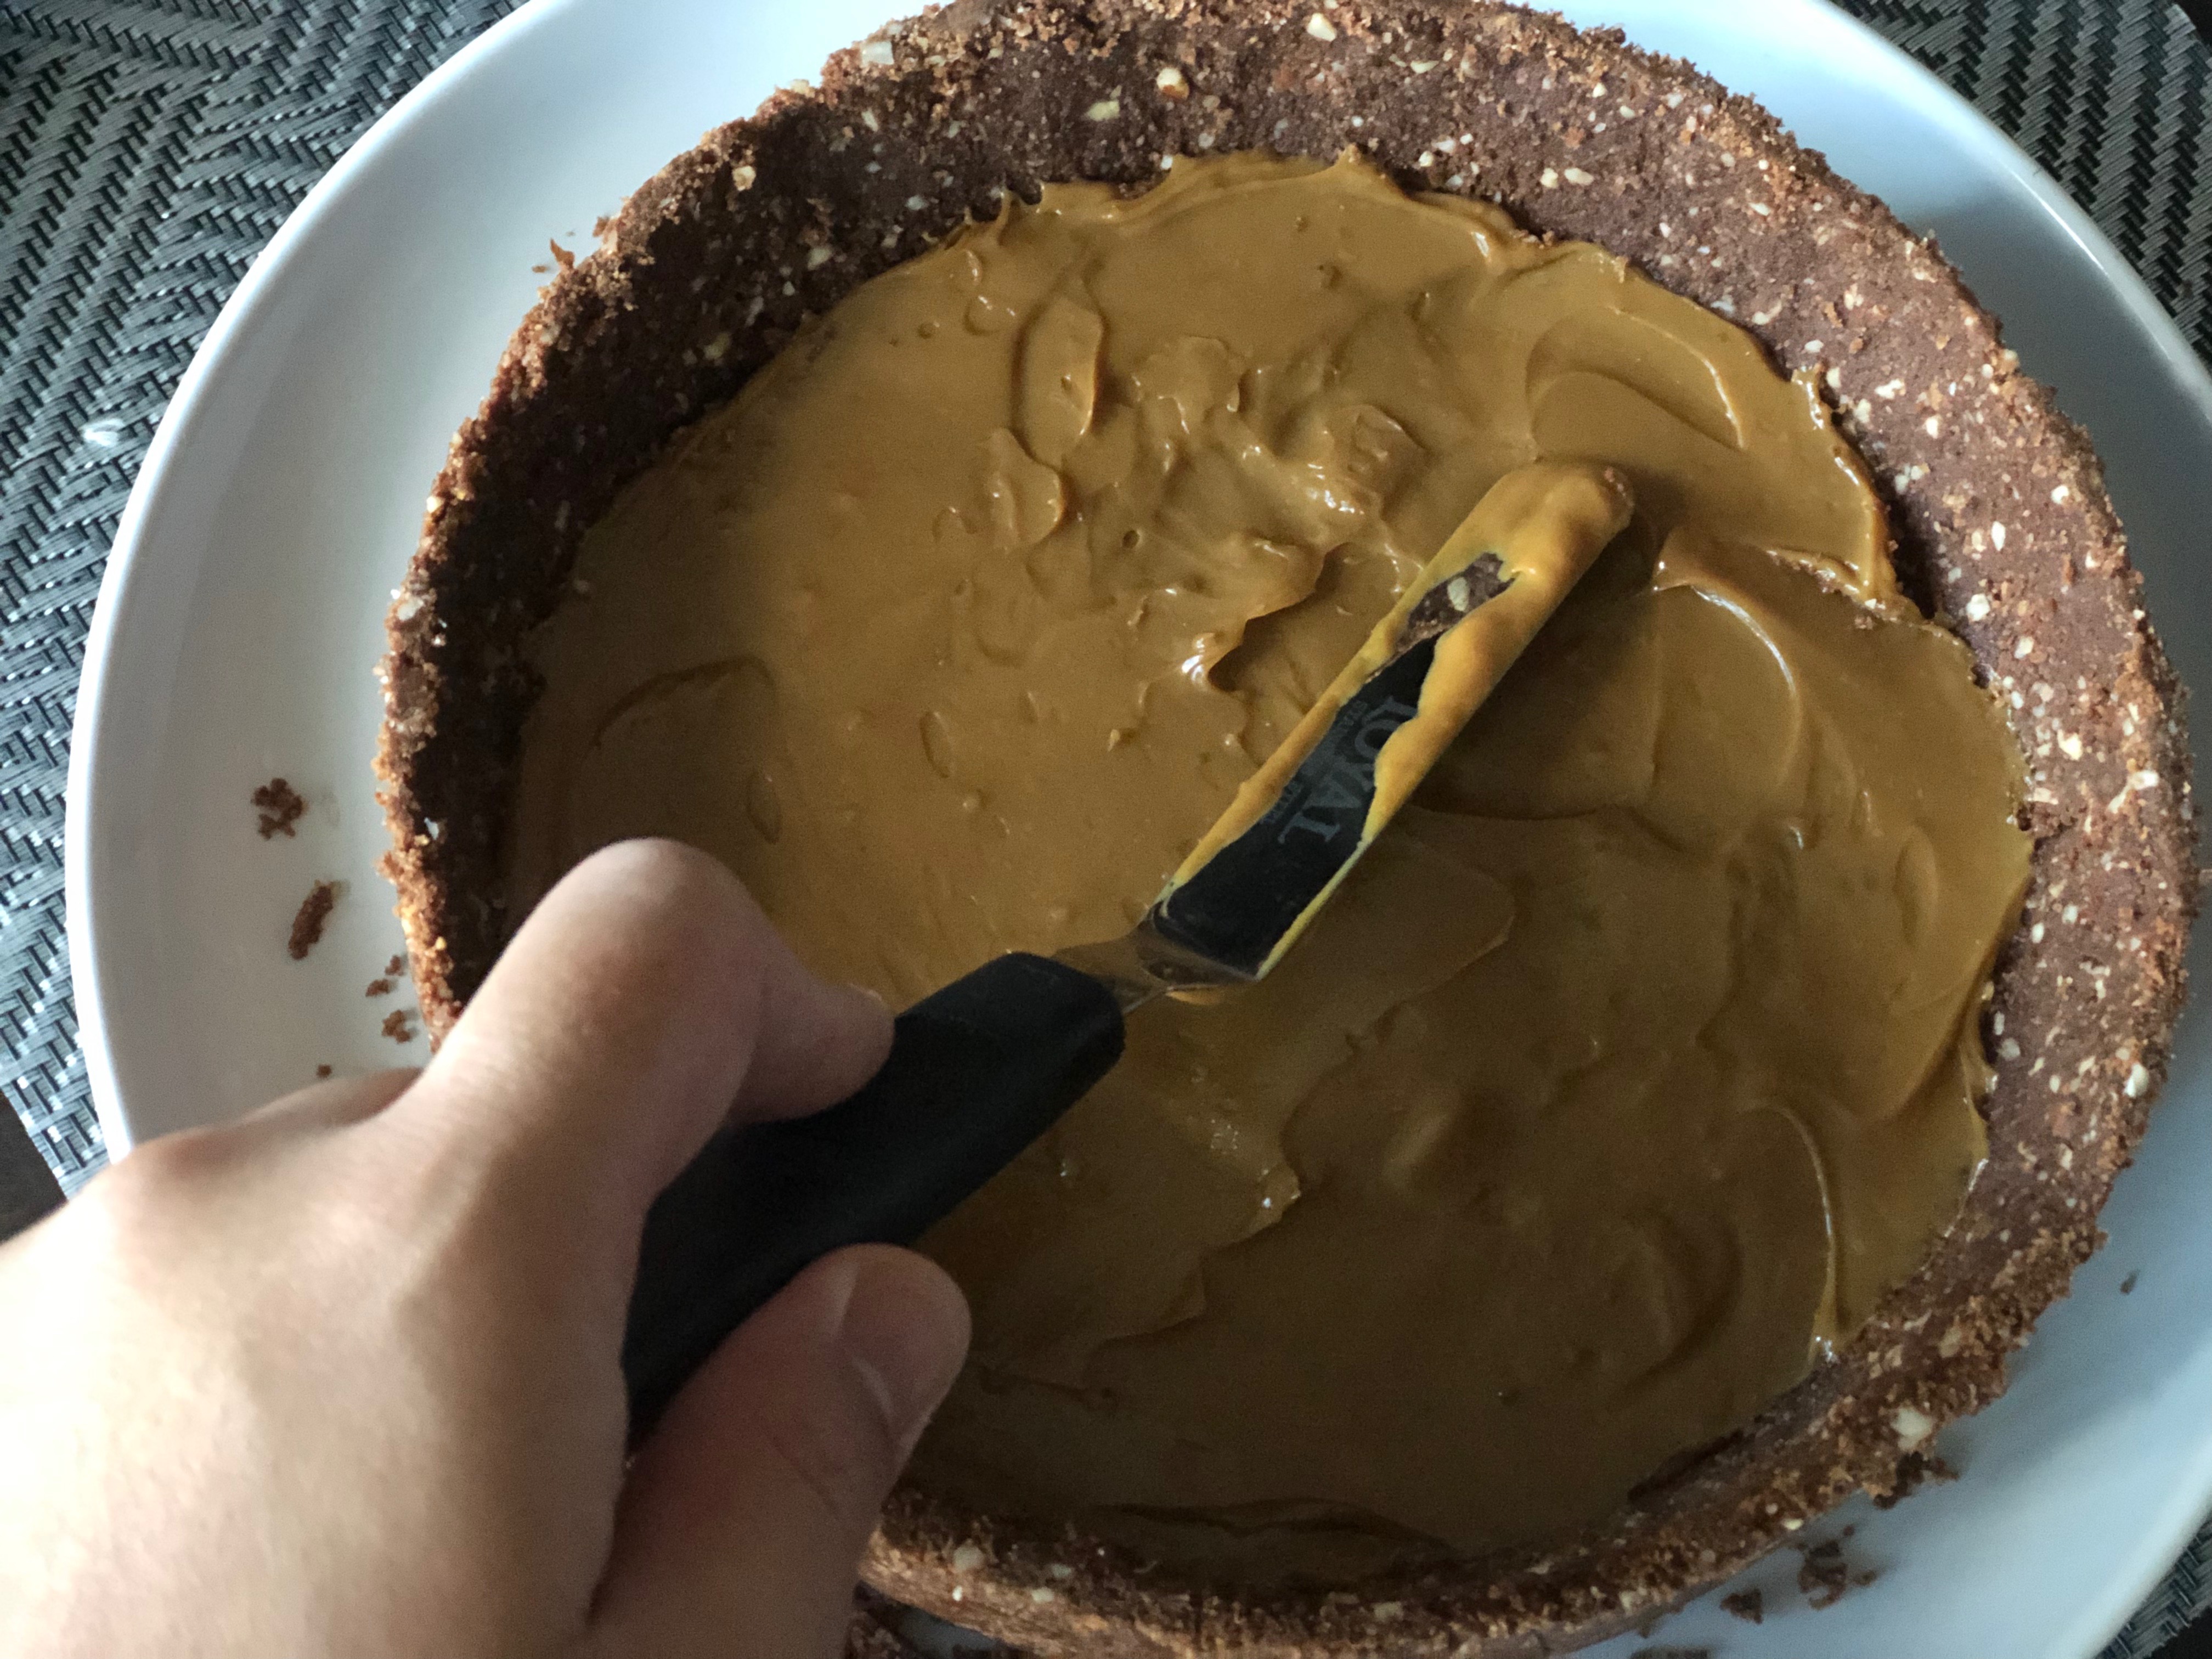
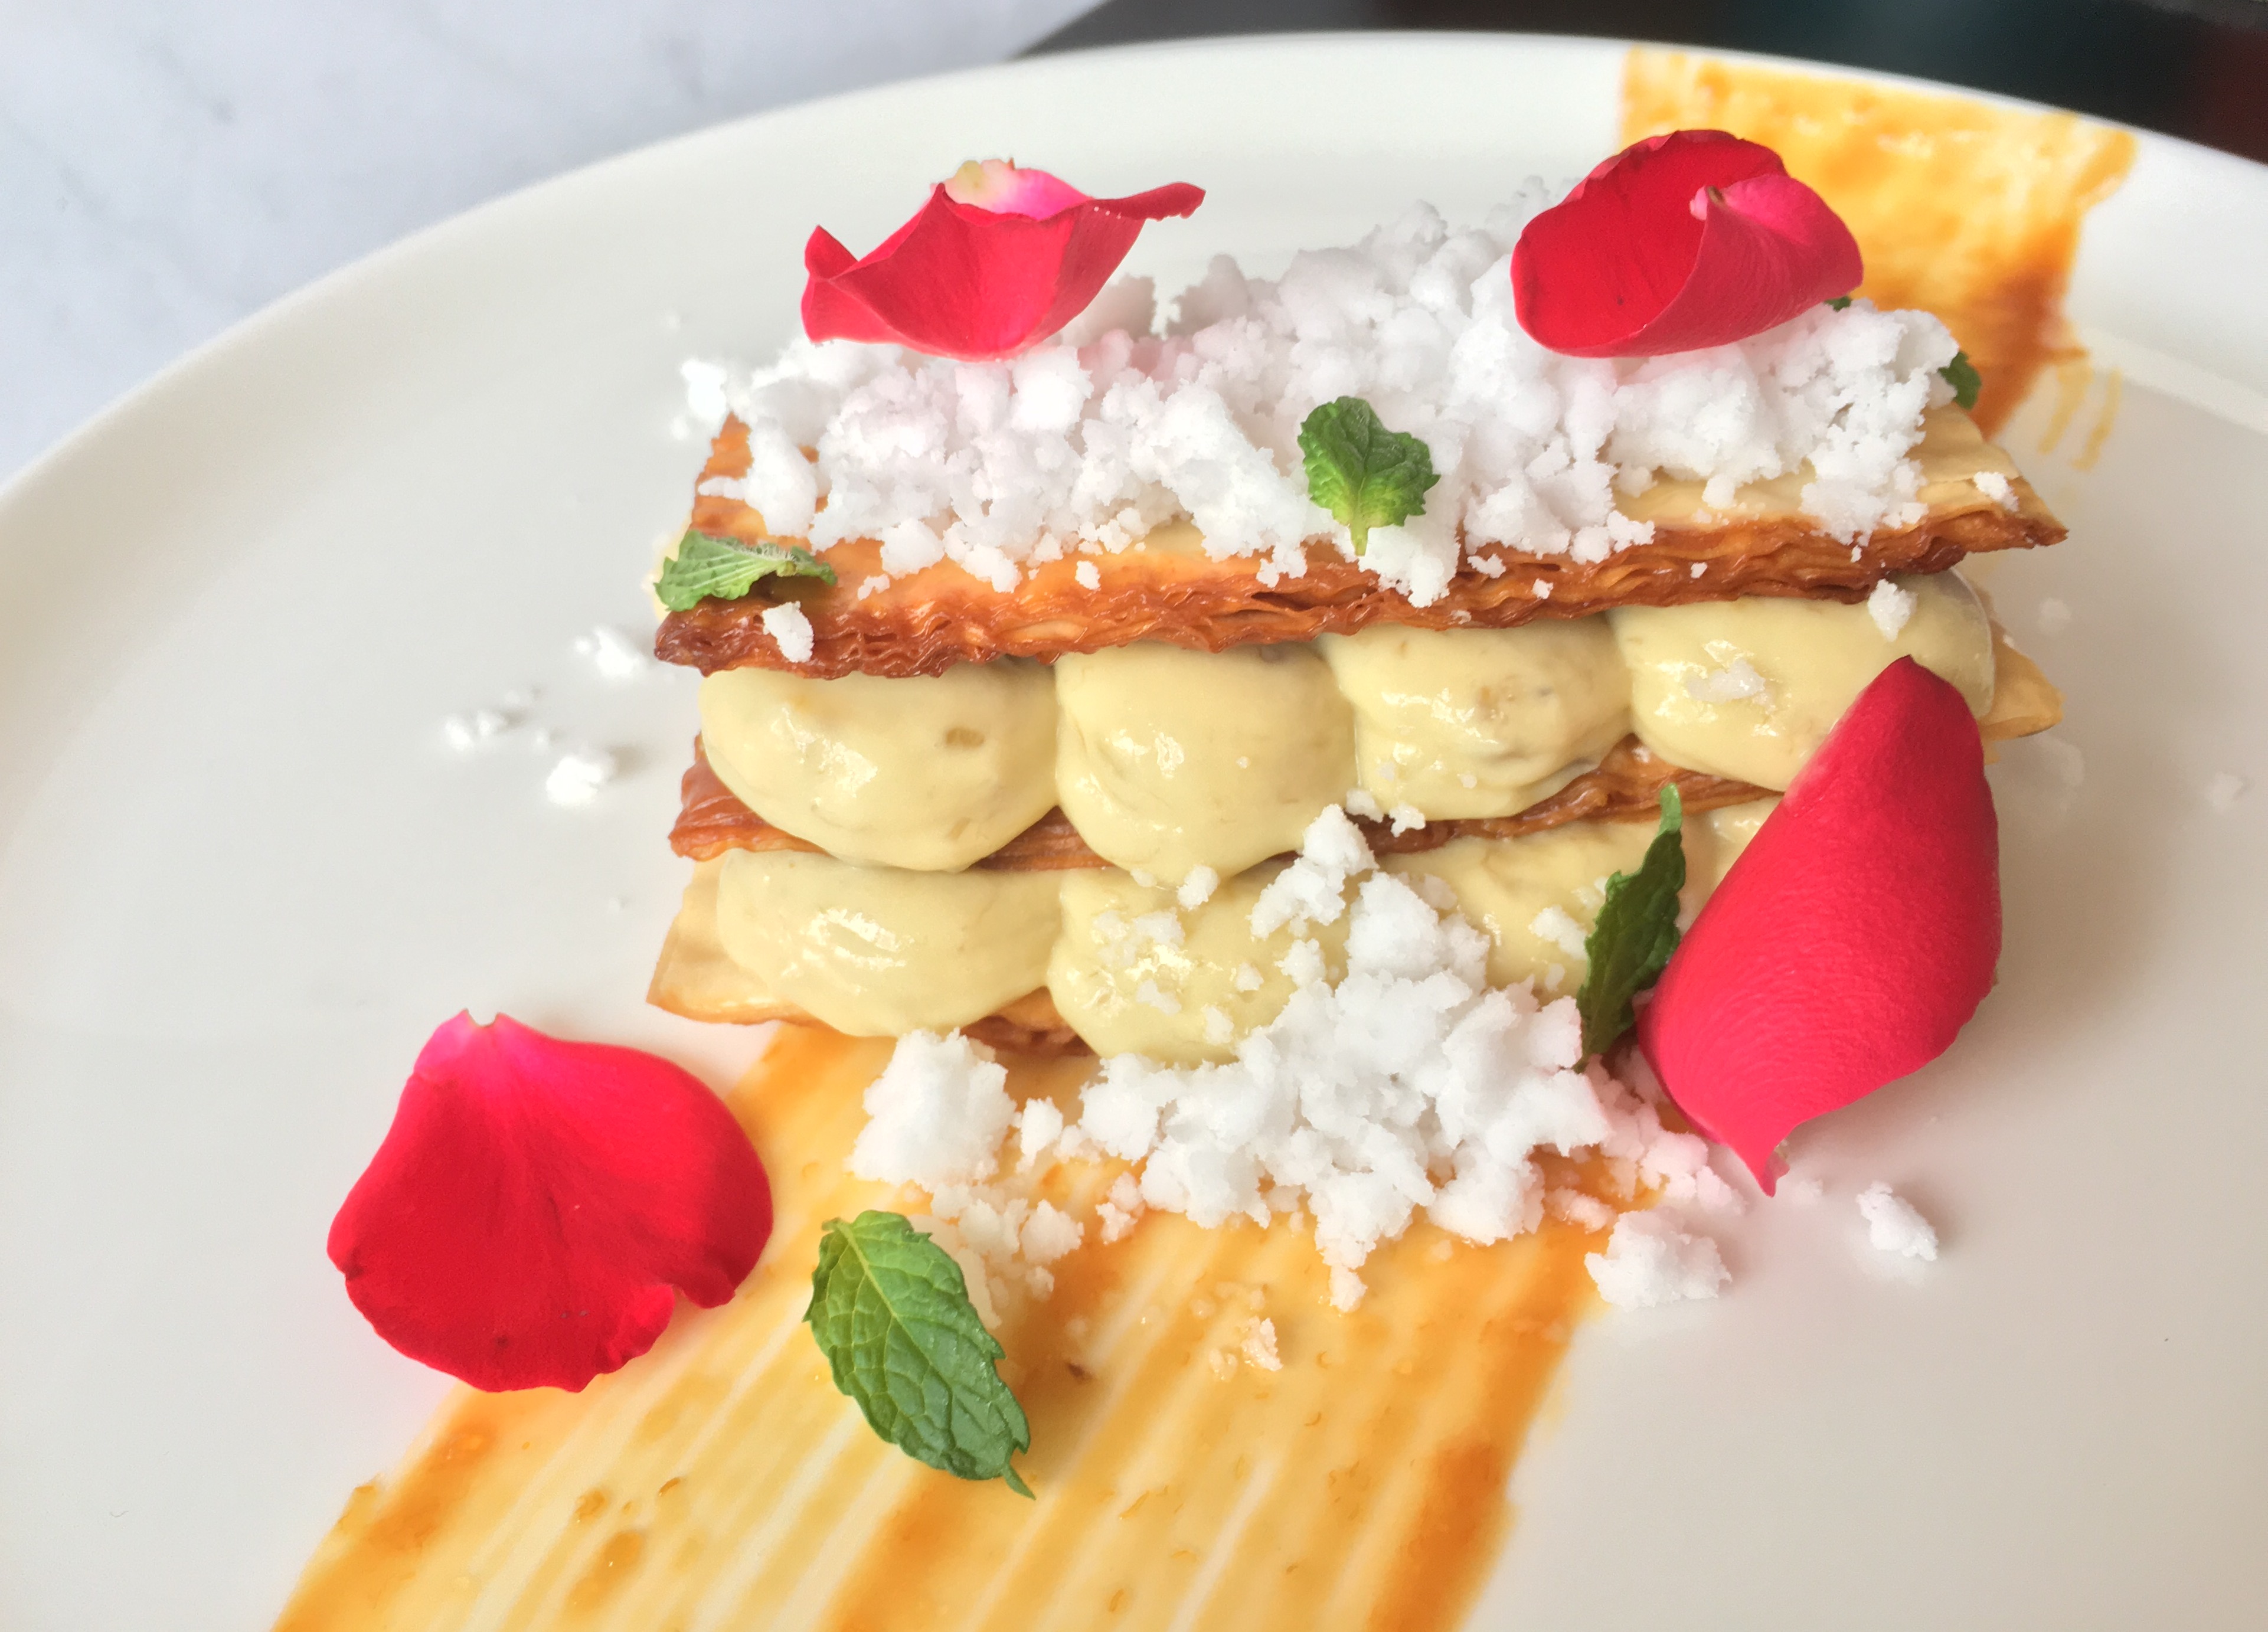
This week’s recipe is a challenge for all of you who are scared of fancy looking desserts with multiple components! With Pat’s background in making pastry, this is easy for him but Ian was a little daunted by this recipe. A Napoleon or Mille-feuille is a layered French dessert consisting of alternating layers of puff pastry and pastry cream. We have adapted a recipe by Antonio Bachour, from his book Bachour. His version substitutes filo pastry (so store bought is fine!) brushed with caramel, topped with coconut snow. What’s not to love? Be brave and give it a try, you’ll be surprised how easy it is and you’ll impress everyone with how pretty it looks.

The coconut snow uses tapioca maltodextrin as a binding agent, which can be hard to find. We found some at a specialty store in Sydney, but you could also buy it online if you have trouble finding it.

This recipe yields 12 serves.

Banana Pastry Cream

  • 7g gelatin sheet
  • 2 cups full-cream milk
  • ½ cup caster sugar
  • 55g corn flour
  • 100g egg yolks
  • 2 medium ripe bananas, mashed
  • 55g unsalted butter

Soak gelatin in cold water until softened (this process is called blooming), then squeeze out excess water and set aside.

In a heavy bottomed saucepan, combine milk and sugar and bring to the boil. In a mixing bowl, whisk together the egg yolks and corn flour. Slowly pour the hot liquid into the egg mixture, a little at first then in a steady stream, whisking continuously. Have an ice bath prepared to set the bowl over if the mixture looks like it’s beginning to split. Once the egg and milk mixtures are combined, return to the saucepan and set over a medium-high heat until thickened enough to coat the back of a wooden spoon. Pour the mixture through a strainer into a bowl set over the ice bath. Add the gelatin and stir to dissolve. Add the butter and banana and stir until the butter has melted. Cover the mixture with plastic wrap and refrigerate for a least an hour, or until set.

Caramel Sauce

  • 114g thickened cream
  • 90g caster sugar

Bring the cream just to the boil in a saucepan, then remove from the heat. Add the sugar to another saucepan with a splash of water, mixing so the sugar is moist. Cook the sugar slowly over a medium heat until it becomes a light amber colour, shaking or stirring the pan every now and then. Once the caramel has reached the colour you like, slowly add the cream in small batches. Be careful as it will splatter and could burn you. Once all the cream is incorporated, cook for another minute, stirring. Remove from the heat and set aside.

Filo Pastry Sheets

  • 8 sheets of filo pastry dough
  • ½ cup unsalted butter, melted
  • ½ cup Caramel sauce

Preheat oven to 175°C.

Line a baking tray with baking paper. Place a sheet of filo on the tray, brush with butter and drizzle with caramel sauce. Repeat this process with six more sheets of filo pastry, then add a final sheet of filo and brush with the butter. Trim the edges of the filo with a paring knife if necessary, and cut into 2 by 4 inch rectangles. Cover with baking paper and top with another baking tray, then bake for around 12 minutes, or until the pastry is golden brown. Set aside and once the pastry is cool, remove from the tray and store in an airtight container.

Coconut Snow

  • 40g tapioca maltodextrin
  • 60g coconut oil
  • 15g icing sugar

Add all ingredients to a food processor and combine, scraping down the sides of the bowl with a rubber spatula occasionally. Set aside.

Banana Caramel Sauce

  • ½ cup thickened cream
  • 95g caster sugar
  • 1 ripe banana, sliced

Make the caramel in the same way you made the Caramel Sauce earlier. Once you have combined the sugar and cream, stir in the banana. Using a stick blender, blend until smooth. Alternatively you could transfer the mixture to a food processor or blender and blend until smooth.

Assembly

Brush some of the banana caramel sauce across a plate and top with one rectangle of the prepared filo pastry. Put the Banana Pastry Cream in a piping bag and cut a 1.5cm opening. Pipe the cream onto the filo pastry in two rows of small dollops, and top with a layer of filo pastry. Repeat the process to form a second layer, and top with a final piece of filo pastry. Dust the top layer with Coconut Snow and garnish with edible flowers or micro herbs to serve.