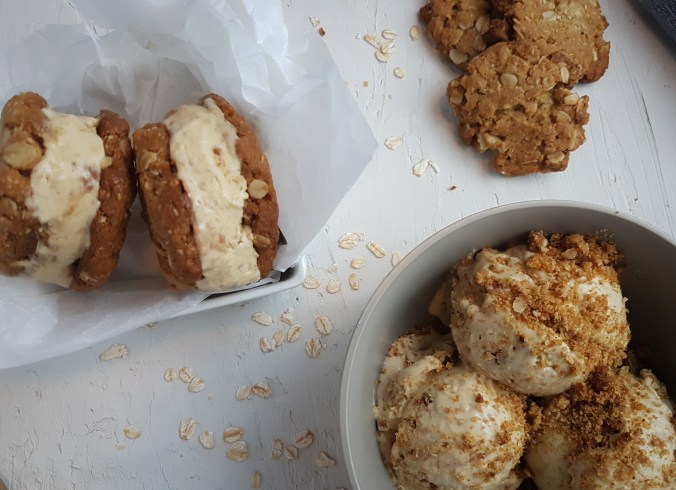
Anzac Biscuits 3 ways
Today is Anzac Day in Australia and New Zealand, a day to honour the men and women of the armed forces of our countries. One of the most famous of Australian foods is the humble Anzac biscuit, which had its origins in World War 1. The biscuits were sent to soldiers overseas and were designed to keep well during transit. These biscuits are still very popular today due to their chewy texture and slightly caramel taste.
We decided to bake a batch to celebrate the holiday. Then after watching Chef’s Table on Netflix we were inspired by Momofuku Milk Bar’s Christina Tosi to try infusing the flavour of the biscuit in an ice cream. Then we went one step further and turned the biscuits and ice cream into an ice cream sandwich! These are the resulting recipes, and it’s up to you how far along the journey you travel. You could just make the Anzac biscuits, or continue on to make the ice cream, or the ice cream sandwiches.
The biscuit recipe makes about 28 biscuits and you only need 10 of these for the ice cream recipe, so you’ll have plenty of delicious Anzac biscuits to share with friends and family (or make two batches and take some to work!)
Anzac Biscuits:
- 150g plain flour
- 165g caster sugar
- 100g rolled oats
- 90g desiccated coconut
- 125g unsalted butter
- 90g golden syrup
- ½ tsp bicarbonate of soda (baking soda)
- 1 Tbsp boiling water
- Preheat the oven to 180° Line 2 large baking trays with baking paper.
- Sift the flour into a large bowl, and stir in the other dry ingredients. Make a well in the centre of the mixture.
- Place the butter and golden syrup in a small saucepan over a low heat, stirring until the butter has melted and the mixture is well combined. Remove from the heat. Dissolve the bicarbonate of soda in the boiling water and immediately add to the butter mixture. Add the mixture to the dry ingredients and mix well with a wooden spoon.
- Roll level tablespoons of the mixture into balls and place on the prepared trays, leaving room for each to spread as it cooks. Flatten each ball slightly with the bottom of a glass or your fingers.
- Bake for 15-20 minutes until golden brown. The biscuits will still be soft to the touch. Leave on the tray for 5 minutes to crisp up before transferring to a wire rack to cool.
Anzac Biscuit Ice Cream:
- 10 Anzac biscuits
- 250ml (1 cup) full cream milk
- 3 Tbsp (60 ml) golden syrup
- 5 egg yolks, lightly whisked
- 375ml thickened (whipping) cream
- Using a mortar and pestle or a food processor, break the biscuits apart into crumbs. Place half of the crumbs into a mixing bowl and set the other half aside.
- Warm the milk in a saucepan until just simmering. Pour the milk into the mixing bowl with the biscuit crumbs and stir well. Allow to steep for an hour. Strain the mixture through a fine sieve back into the saucepan, wringing out all the liquid from the crumbs. Discard the solids. Add the golden syrup to the saucepan and bring the milk mixture back to a simmer, stirring well to combine.
- Place the egg yolks in a mixing bowl. Pour the warm milk mixture in a steady stream into the yolks, whisking continuously so the eggs don’t curdle. Pour the mixture back into the saucepan, stirring continuously, and cook over a low heat until the mixture thickens. The mixture is ready once it is thick enough to coat the back of a wooden spoon. Set aside for 10 minutes to cool, then refrigerate for at least 2 hours, or overnight.
- Churn the mixture in an ice cream maker to the manufacturer’s instructions. Just before the ice cream is set, add half of the remaining biscuit crumbs and stir through the ice cream. Keep the other half for garnishing when serving.
- Transfer the ice cream to a container, cover and freeze for at least an hour to set.
- Serve a few scoops of the ice cream in a small bowl, covered with a dusting of the reserved biscuit crumbs.
Anzac Biscuit Ice Cream Sandwich:
- 2 Anzac biscuits
- 1 scoop Anzac Biscuit Ice Cream
Take a scoop of ice cream and place on the flat side of an Anzac biscuit. Add another biscuit to the top, flat side against the ice cream and gently press together. Smooth out the edges of the ice cream filling with the flat side of a knife and serve immediately.
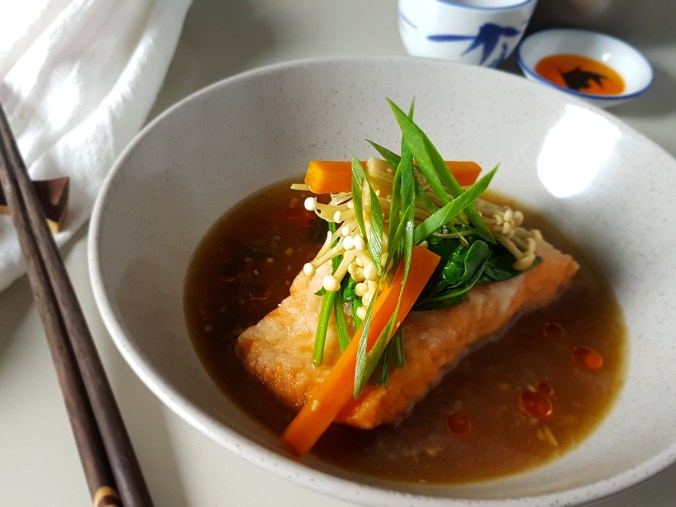 When we began Recipe Road, we listed our favourite cuisines that we hoped to explore. We’ve presented some French dishes, and plan to explore Italian cuisine after our travels in Italy later this year. Japanese is our other love, and we know we’re not alone here! Who can resist the delicacy of finely sliced sashimi or sushi with a side of soy sauce, wasabi and some pickled ginger? For us it’s using the flavours of sake, mirin, soy sauce and rice vinegar in various combinations that keeps us inspired; whether it’s creating a simple teriyaki dish or something a little more complex like this salmon dish. The joy of this dish is the beautiful sauce, which enhances the natural flavour of the salmon fillet and vegetables.
 This week we continued to draw inspiration from Yotam Ottolenghi & Ramael Scully’s Nopi cookbook. As always, we were inspired by the flavours these chefs use, and this recipe contained a new technique for us, smoking the corn. This was surprisingly easy, there was no fancy equipment required. Simply place the corn cobs in a colander or steaming basket (we used a bamboo steaming basket) inside a large pot sealed with a lid. The smoke comes from burning the husks of the corn in the base of the pot. If you struggle to find corn with the husks still attached, you could use rice instead. Just line the base of the pan with aluminium foil and spread 200g of uncooked rice across the base. If you do this, the cooking time will need to be reduced from 5 minutes to 3 minutes. The cooking times for smoking need to be precise: cook for too long and the smoky flavour can become overpowering.
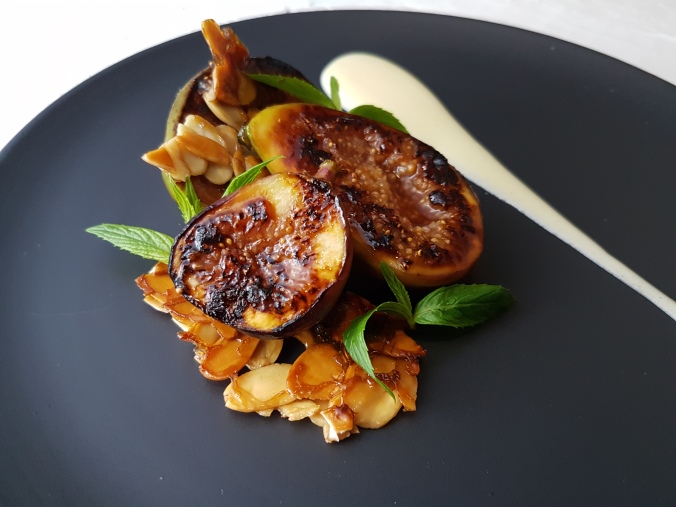 Figs are in season here in Sydney and every store seems to have plump, juicy figs on display. We couldn’t resist any longer, and decided to try Maggie Beer’s grilled fig recipe. Simply glazing and grilling the figs is a great way to highlight the great quality produce. The Almond Crisp and Verjuice Sabayon add texture and tartness respectively, but don’t detract from the real star of this simple dessert.